Friday, November 28, 2008

Tip #20 – Getting Management Information with SQL

Advantage has several system procedures dedicated to retrieving management information. This information ranges from installation and configuration information to information about users.

One of the most useful is sp_mgGetUsageInfo which returns the current, max used, configured and rejected counts like you see in the Advantage Configuration utility. The system procedure does not take any arguments so running EXECUTE PROCEDURE sp_mgGetUsageInfo() will return the following table.
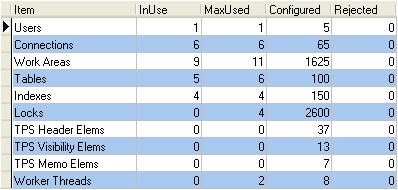
Advantage Usage Info

Other server information can be obtained using sp_mgGetActivityInfo which returns the number of operations, logged errors and up time. For information on communication statistics you can use sp_mgGetCommStats which provides information on communication to the server. To see how much memory your configuration options are using run the sp_mgGetConfigMemory system procedure.

The sp_mgGetInstallInfo system procedure provides information about the installation options. These include the registered owner, serial number, user option, version, install date, character sets (ANSI and OEM) and whether or not replication is enabled. This information can be very valuable if your application relies on a particular server version or if you need replication prior to adding publications and subscriptions to a data dictionary as part of an upgrade.

Several system procedures provide information about current users. You can get a list of connected users with the sp_mgGetConnectedUsers procedure. To get a list of users who have  a specified table or index opened use sp_mgGetTableUsers or sp_GetIndexUsers. You can also get lock information with sp_mgGetLockOwner and sp_mgGetUserLocks. You can also disconnect users with the sp_mgKillUser.

Thursday, November 27, 2008

Tip #19 – Setting Table Properties via SQL

The standard SQL syntax includes a CREATE TABLE command for creating a new table. This statement can be used on free table and dictionary connections. When connected to a dictionary the table will be created in the dictionary if the user has the proper rights. If you want to create a free table on a dictionary connection use the AS FREE TABLE command at the end of your CREATE TABLE statement. You can also specify IN DATABASE to ensure that the table is created in the data dictionary.

The CREATE TABLE syntax includes the ability to add constraints for the new fields. However, it does not include syntax for creating other field and table properties available to dictionary bound tables. These include; validation expressions, validation messages, default indexes, auto create and encryption. To set these properties you must use system procedures.

sp_ModifyFieldProperty modifies a property for a specific field within the table. This system procedure can set any of the field constraints; minimum and maximum values, default value and null valid which can also be set with a CREATE TABLE statement. This system procedure also allows you to add/modify a field comment and validation message. These properties are not part of the CREATE TABLE syntax.

The following example sets the comment/description for the Address1 field in the Address table. In this case we do not need to specify a way to handle validation since this does not affect the table data. If a validation rule such as APPEND_FAIL is specified you must also define a Fail Table so records not meeting the new criteria can be preserved.

EXECUTE PROCEDURE sp_ModifyFieldProperty('Address', 'Address1', 'COMMENT', 'Street Address', 'NO_VALIDATE', NULL)

sp_ModifyTableProperty modifies a property for the specified table. These properties include; comment, validation expression, validation message, primary key, encryption, default index, permission level, auto create and memo block size. The syntax is very similar to sp_ModifyFieldProperty with the same mechanism for handling records which do not meet the new constraints.

The following example script encrypts all the tables in the dictionary. It first gets a list of tables using the system.tables view and then sets the TABLE_ENCRYPTION property. This is similar to setting the Auto Create Property for all tables which is outlined in a knowledge base article.

-- Script to Encrypt all Tables
DECLARE @cTables CURSOR AS SELECT * FROM system.tables;
OPEN @cTables;
WHILE FETCH @cTables DO
  TRY
    EXECUTE PROCEDURE sp_ModifyTableProperty(@cTables.Name,
     'TABLE_ENCRYPTION', 'TRUE', 'NO_VALIDATE', NULL);
  CATCH ADS_SCRIPT_EXCEPTION
    -- If table is already encrypted then continue to the next table
    IF __errcode = 5098 THEN
      CONTINUE;
    ELSE
      RAISE;
   END IF;
  END TRY;
END WHILE;
CLOSE @cTables;

Wednesday, November 26, 2008

Tip #18 – Getting Table Information with SQL

As mentioned in tip #16 there are many system tables which provide schema information. For example the system.tables view returns information about the tables. It is important to note that this view only returns information about data dictionary bound (database) tables.

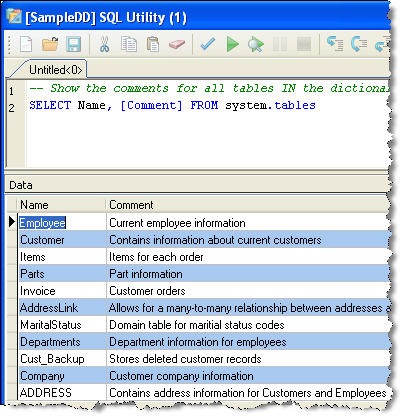
The system.tables view returns one row for each table in the data dictionary. It contains a lot of useful information about each table such as; the primary key, default index, encryption, validation expression and comments. The following example returns the table name and comment for all the tables in the data dictionary.

System.Tables Example

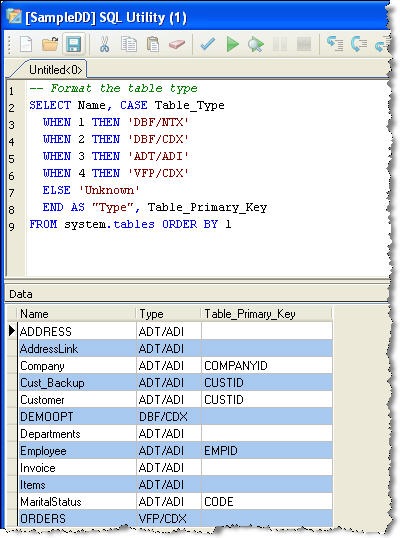
The table type is stored as an integer which correspond to to the table type constants defined in the ACE Header files. These table type constants are listed below:

  • ADS_NTX = 1  DBF with single tag index files
  • ADS_CDX = 2  DBF with compound indexes
  • ADS_ADT = 3  Advantage proprietary file format
  • ADS_VFP = 4  Visual FoxPro 9 DBF files
You can use a CASE statement to return a more meaningful description of the table type as shown below:

Show Table Type

Tuesday, November 25, 2008

Tip #17 – Set Database Properties via SQL

Data dictionary properties can be set in a variety of ways. Advantage Data Architect provides a graphical interface for changing these properties, however, sometimes they need to be changed programmatically. This can be done using an API, AdsDDSetDatabaseProperty or using a system procedure.

The sp_ModifyDatabase system procedure sets one database property at a time. To use the system procedure you specify the property using its keyword (i.e. VERSION_MAJOR) and then specify the value (i.e. 2). The example script below changes the database version and adds the date of the update to the comments field.

-- Script to UPDATE the database properties
DECLARE @sComment STRING;
-- Get the current comment
@sComment = (SELECT [Comment] FROM system.dictionary);
-- Add the upgrade info to the comment
@sComment = @sComment + '-- Upgraded to version 2.0 ';
-- Add the current timestamp to the comment
@sComment = @sComment + CONVERT(NOW(), SQL_CHAR);
-- Update the dictionary properties
EXECUTE PROCEDURE sp_ModifyDatabase('VERSION_MAJOR', '2');
EXECUTE PROCEDURE sp_ModifyDatabase('VERSION_MINOR', '0');
EXECUTE PROCEDURE sp_ModifyDatabase('COMMENT', @sComment);

Monday, November 24, 2008

Tip #16 – Get Database Information via SQL

Advantage has twenty-two system views which can be used to display information about a database. These views allow you to obtain metadata for all of the objects in the dictionary. Each of these view names is preceded with “system.” and are shown below:

columns dictionary effective permissions fts functions
indexes index files links objects packages
permissions publication articles publications relations stored procedures
subscriptions tables triggers usergroup members usergroups
users views      

For this tip I will focus on system.dictionary, since it is rarely used but contains a lot of useful information. This system view contains all the properties of the dictionary itself. This includes the major and minor versions, the table encryption password (only available to adssys), whether logins are required or disabled and many other properties.

System.Dictionary Table

The system views are available to all data dictionary users, although some fields are only available to administrative users. These tables can be very useful for displaying information in your application and for administrative scripts.

Friday, November 21, 2008

Tip #15 – Creating Code Templates

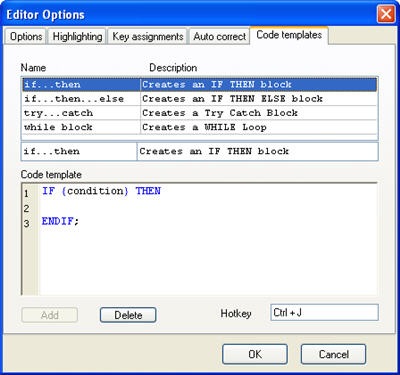
Code templates, AKA code snippets, insert a code block into the SQL editor. You can define these code templates in the Editor Options which you get to by choosing SQL->Options from the menu.

ARC SQL Properties

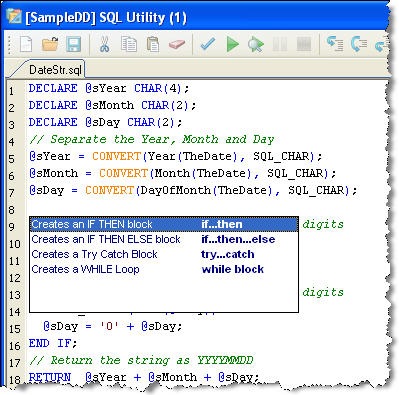
Once these code templates have been defined you can insert them into the SQL Editor by pressing [CTRL+J]. This will bring up a menu which displays a list of the code templates you have defined. Selecting one from the list inserts the defined code at the current cursor location.

ARC SQL Code Template

Thursday, November 20, 2008

Tip #14 – Using Auto Correct

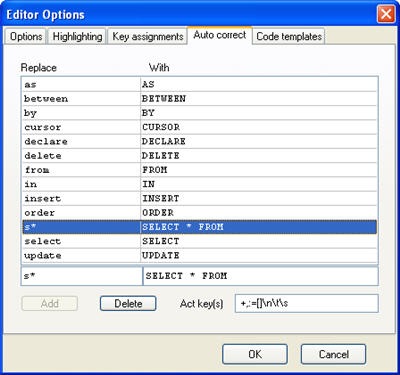
Auto correct is another great feature which is included in the ARC SQL editor. By default there are not auto correct rules defined for the editor. However you can add your own rules on the Auto correct tab on the Editor Options window.

ARC SQL Properties

I like to have my SQL keywords in all caps for readability. Therefore I added the keywords that I use most to the Auto correct options. This will automatically replace a lower case “select” with “SELECT” automatically. Remember that it will only replace when an exact match is defined. Therefore “Select” will not be replaced with “SELECT” in my case.

One additional benefit of this feature is you can define shortcuts which will be replaced with a useful function. I like to define “s*” to be replaced with “SELECT * FROM”. This gives me a quick way to select all the contents of a table.

Wednesday, November 19, 2008

Tip #13 – SQL Editor Key Assignments

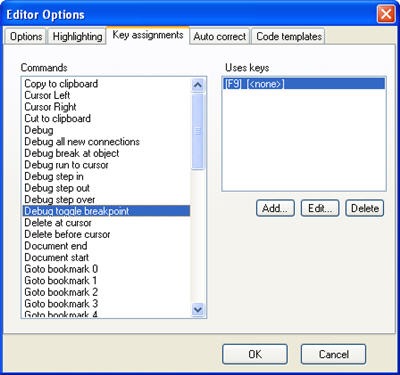
There are many key assignments which provide quick access to various functions within the SQL Editor. Several keys provide navigation such as the left and right keys as well as document end [CTRL+END] and document start [CTRL+HOME]. You can also navigate through your SQL statements using bookmarks. You can assign up to 10 bookmarks (0 – 9) for each SQL file.

Beginning with ARC 9.0 several key assignments were added for debugging. These include a debug run [CTRL+F5] which runs the SQL statement in debug mode, as opposed to running [F5] the SQL statement. You can also step in [F11], step out [SHIFT+F11] and step over [F10]. You can toggle breakpoints using the F9 key.

ARC SQL Properties

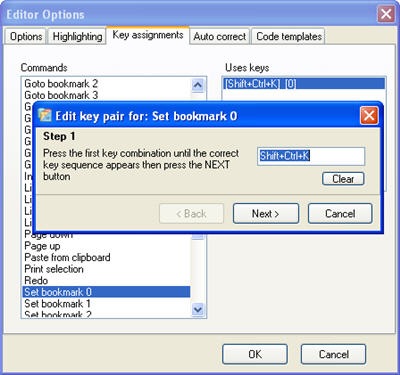
All of these key assignments can be modified in the editor as well. Simply select the option you wish to change and click on the edit button. You can also add an additional key shortcut to the selected option.For example you cna change the Set Bookmark {#} options to more closely match the Goto Bookmark {#} shortcuts. Since Goto Bookmark is set to [CTRL+K] + [#] by default I changed Set Bookmark to [CTRL+SHIFT+K] + [#].

ARC SQL Key Assignment

This shortcut is a two key sequence so you need to assign two keys for the Set Bookmark {#} actions. So after choosing the first key in the sequence click Next > to assign the second key of the sequence.

Tuesday, November 18, 2008

Tip #12 –SQL Syntax Highlighting Options

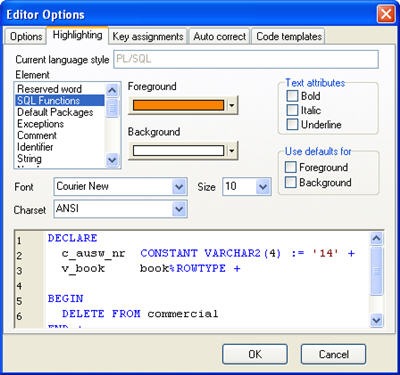
The  SQL Utility automatically highlights your SQL syntax just like many other code editors. You can customize the various highlighting options to suit your own preferences. You reach the SQL Utility options by choosing SQL->Options… (the SQL menu is visible when the SQL Utility window is open).

ARC SQL Properties

In this screenshot I have changed the highlighting option for SQL Functions so they will be displayed in orange, the default is black. This makes it easier to identify the built-in SQL functions when they are used in the statement, notice the CONVERT function below.

ARC SQL Highlighting

There are highlighting options for many categories including; Reserved Words, SQL Functions, Exceptions, Comments, Strings and Datatypes. You can also change the color of the left margin and gutter background. If you change the gutter background and don’t like the new color, like I did, the default values are R: 236, G: 233 and B:216.

Monday, November 17, 2008

Tip #11 – Displaying Line Numbers in SQL Utility

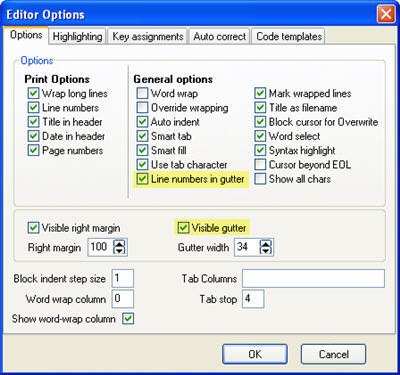
There are many options for customizing the SQL Utility in ARC which can be viewed by selecting SQL->Options (the SQL menu is visible when the SQL Utility is open). In order to display line numbers you must make two changes. First select the Line numbers in gutter option under General Options. Then select Visible gutter to display the gutter in the text editor area.

ARC SQL Properties

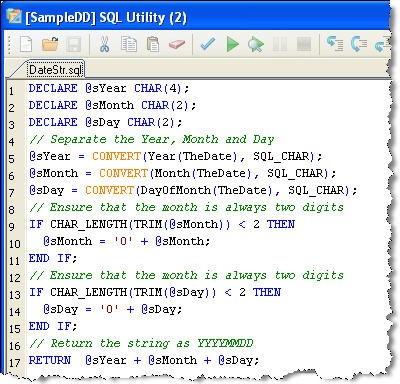
By setting this option the line numbers will be displayed in the gutter. You may need to increase the gutter width to properly display the line numbers.

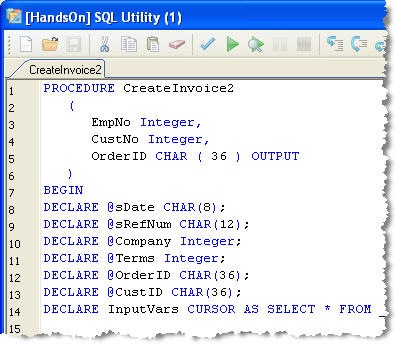
SQL Utility Line Numbers

Friday, November 14, 2008

Tip #10 – Printing Table Schema

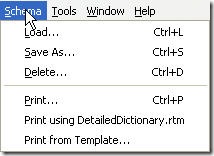
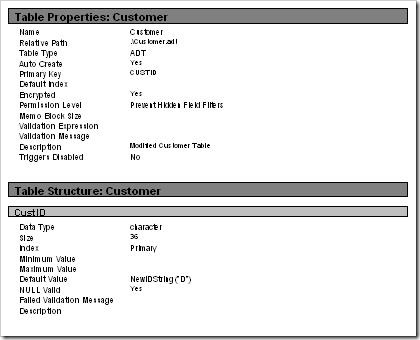
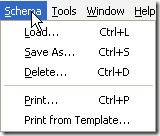
ARC Print Menu ARC 8.0 introduced two new table schema printing templates. These templates print either a simple or detailed view of the table schema. Table schema printing options are found on the Schema menu shown on the left.
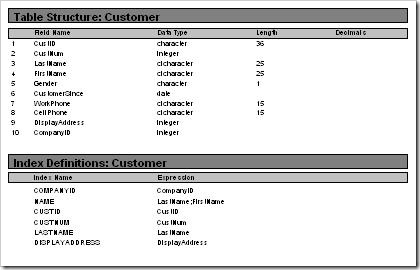
The default is to use the short report which lists all the fields in a grid format along with all the indexes. The detailed report includes the table properties, field properties and index properties for the table. My example table, which contains 10 fields and 6 indexes, generated a five page detailed report. The last used template is also displayed as a menu option as pictured.

The Schema menu appears on the Table Designer in ARC 8.x and on the main menu bar in ARC 9.x. Yesterday’s tip contains more information about the schema menu.

Simple Report FormatSimple Report Template Example

Detail Report TemplateDetailed Report Template Example

Thursday, November 13, 2008

Tip #9 – Saving Table Schema Information

Back in 2007 I wrote a tech-tip about Schema Templates, which was a new feature added to ARC 8. This allows developers to save the schema of a table into a file which can be loaded into the table designer when creating a new table. The schema template contains all of the information about the table including the field descriptions, constraints, default values, validation expressions and indexes. This can be very useful if you are creating several tables with similar schema.

Schema Menu The Schema menu is located on the Table Designer window in ARC 8.x. It has been moved to the ARC menu in version 9.0. Schema files have a default extension of arcschema (i.e. customer.arcschema). Choosing the Load… menu item allows you to choose a schema to be loaded into the Table Designer. You can save the current table schema by choosing the Save As… item. The Delete… command removes the selected schema.

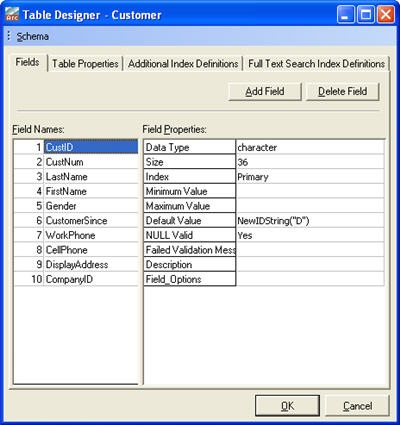
You can work with table schemas in both ARC 8.x and ARC 9.x the table properties windows are shown below.

ARC 8 Table Designer Version 8 Table Designer
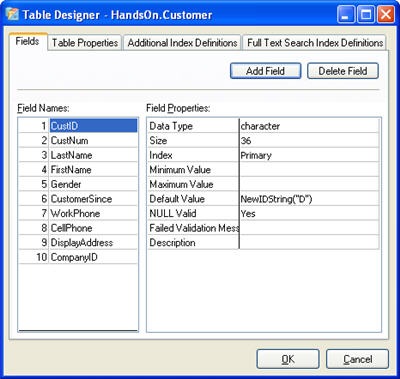
ARC 9 Table Designer Version 9 Table Designer
Wednesday, November 12, 2008

Tip #8 – ARC User Interface Options

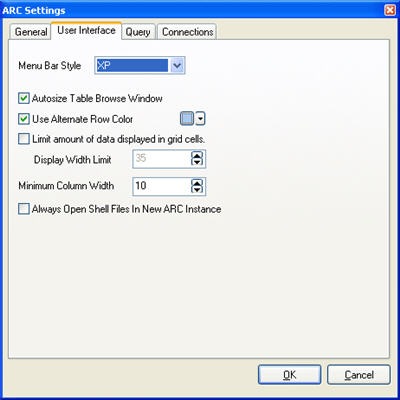
Both ARC version 8 and 9 have several options for modifying the user interface. You can change some of the elements of the user interface by selecting Tools->ARC Settings, then click on the User Interface tab.

ARC_UISettings

You can select from several menu bar options; Flat, Enhanced, Standard, Office 11 and XP. You can also autosize the Table Browse window. I like using alternating colors on grid rows, this is the default behavior but you can turn this off or change the color.

Limiting the amount of data displayed in grid cells essentially this constrains the size of the cells in the grid. Finally you can specify if a new instance of ARC opens when you double-click a file associated with ARC. The default is to open these files (i.e. ADD, ADT, DBF) in the current instance of ARC. However, if you want each file opened in its own ARC instance select the “Always Open Shell Files in New ARC Instance”

Tuesday, November 11, 2008

Tip #7 – ARC Connection Default Values

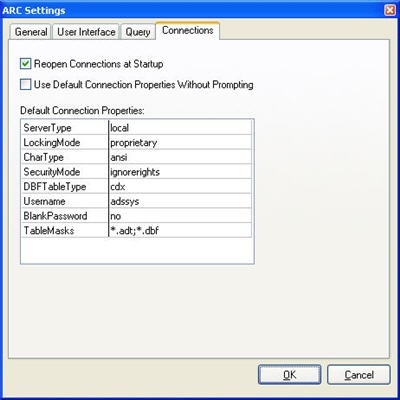
You can configure the default values for creating new connections in Advantage Data Architect (ARC). This makes creating connections a bit easier since you will always get the connection configuration you want. For instance, I almost always use Remote server (Local is the default) and blank passwords for my example databases. By changing the defaults I always get these settings when creating a connection to a data dictionary.

Note: You must restart ARC for the new connection settings to take effect.

You can also specify other defaults such as; LockingMode, CharType, SecurityMode, DBFTableType, Username and TableMasks. Another useful feature is the ability to accept the defaults without prompting which eliminates a step from the connection wizard.

ARC Connection Settings

Monday, November 10, 2008

Tip #6 – Updating Advantage Data Architect

ARC 9.0 Help MenuAdvantage Data Architect (ARC) has a automatic update feature included in version 9.0. ARC will automatically check for updates each time it is shut down. You can manually check for updates by selecting “Check for Updates. . .” from the Help Menu.
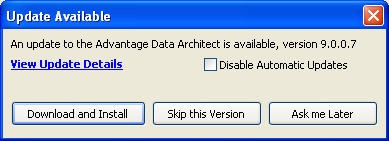
If an update is available you will be prompted to install the update. The dialog includes a link to the details of the update and an option to disable automatic updates. You can turn on automatic updates on the General tab of the ARC Settings dialog.

Update Available Dialog

Saturday, November 8, 2008

An Advantage Video

Sybase has been posting several promotional videos to YouTube over the past year. This week they posted a video about Advantage done by the European Advantage Team. I thought you might like to take a look.

Advantage Database Server Overview

You can see other Sybase videos on YouTube.

Friday, November 7, 2008

Tip #5 – Bypassing the Advantage Discovery Process

When an Advantage client connects to the server it goes through a series of steps to discover the Advantage server. These steps are generally executed very quickly and the server is found and a connection is made. However, if you get the dreaded 6420 or 6060 error you have to start troubleshooting a connection issue.

I wrote an article on troubleshooting Advantage connection issues which details the discovery process. However, the discovery process can be avoided by changing your connection string or by specifying details in the ADS.INI file. By specifying a port number in the connection string the Advantage communication layer will not try to discover the server instead it will attempt direct communication to the specified server on the specified port. The following data paths would make a direct connection to Advantage without any discovery.

\\Server:6262\Data\MyDictionary.add
\\192.168.0.10:6262\Data\

You can also make a direct connection to an Advantage server by specifying the LAN_IP and LAN_Port in the ADS.INI file. You specify these settings under a heading which specifies the server name associated with the IP address. When the client connects it will check for the server name specified in the connection string with the headings in the ADS.INI file. For example an entry for MyServer is specified in the ADS.INI file (see syntax below) so the connection string \\MyServer\Data\MyDictionary.add will become \\192.168.0.10:6262\Data\MyDictionary.add.

[MyServer]
LAN_IP = 192.168.0.10
LAN_PORT = 6262

If a connection to the server fails using this information different error codes will be returned. If the IP address cannot be reached a 6097 error will be returned.

Thursday, November 6, 2008

Tip #4 – Advantage Command Line Switches

Advantage configuration parameters can be set using the Advantage Configuration Utility, by modifying the registry (Windows) or configuration file (Linux and Netware) or using command line switches. These switches can be very useful if you need to start Advantage with a particular configuration for testing. The settings you specify will not be persisted, therefore, starting the service without the switches will revert to the configured settings.

Since Advantage for Windows runs as a service you must run Advantage as an executable to use these switches. This is done by specifying the /exe switch. The following example runs Advantage as an executable with 100 connections, 500 tables, 5000 workareas and 500 indexes.

ads /exe -c100 -d500 -w5000 -i500

The command line switches can be used directly with the Linux and Novell versions of the server. A list of the common configuration switches is below.

Switch Description
-C Number of Connections
-L Number of Data Locks
-I Number of Index Files
-D Number of Tables
-W Number of Work Areas
-T Number of Worker Threads

There are three other command line switches which would rarely be used. Disable Failed Transaction Recovery (-F) will disable the automatic rollback of failed transactions. If the file server fails when a transaction is active the server will automatically roll back any transactions when it starts again. Using the –F flag will leave the transactions in their incomplete state. The Help Screen(-H) command line switch only applies to Advantage Database Server for Netware. It displays a screen with all of the valid command line configuration parameters and the server is not loaded. Finally the Index Sort Buffer Size (-Z) is used when building indexes. If you have very large key sizes in your index you can increase the buffer size to improve sorting performance.

Wednesday, November 5, 2008

Tip #3 – Testing with Different Server Versions

There are times when you need to test with several versions of Advantage prior to a release or when re-creating a customer issue. Advantage works just fine in a virtual environment which is a great way to simulate different environments with less effort.

However, there are times when you may simply want to compare functionality or performance without having to go to a virtual environment. Or you want to use the same hardware to test performance. Multiple versions of Advantage can be installed on the same machine although only one can be running at a time. Simply install the newer version first (i.e. 9.x then 8.x) since the install will remove previous versions. You will need a valid serial number and validation code for each version.

Once two or more versions of the server are installed you need to specify which one to run when the service is started. The executable to run when the Advantage service is started is defined in the registry under HKEY_LOCAL_MACHINE\SYSTEM\CurrentControlSet\Services\Advantage\ImagePath. By changing this key a different version of Advantage is used. Example ImagePath values using the default install locations for several versions are below.

  • Advantage 7.0 - C:\Program Files\Extended Systems\Advantage\Server\ADS.EXE
  • Advantage 8.0 - C:\Program Files\Extended Systems\Advantage 8.0\Server\ADS.EXE
  • Advantage 8.1 - C:\Program Files\Extended Systems\Advantage 8.1\Server\ADS.EXE
  • Advantage 9.0 - C:\Program Files\Advantage 9.0\Server\ADS.EXE

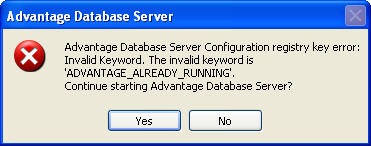
You may see some error messages when you start an older version of Advantage since new configuration options are periodically added. These new configuration settings should not affect the server, however, an error will be displayed at startup unless you set the Suppress Message Boxes configuration parameter to true.

Advantage Configuration Error

Tuesday, November 4, 2008

Tip #2 – Miscellaneous Server Settings

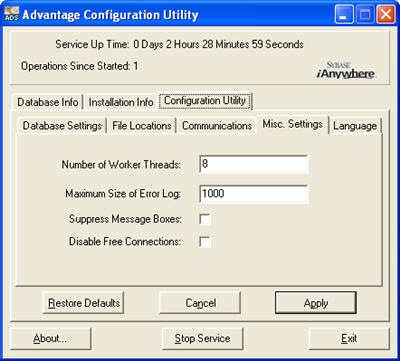
The Advantage Configuration Utility provides an easy interface for configuring your Advantage Server. One of the rarely used tabs is Misc. Settings. There are four options on this tab which can provide some useful functionality.

Advantage Configuration Utility

Number of worker threads: This setting determines the maximum number of concurrent operations the server will process at a time. If the number of simultaneous requests exceeds this value the additional requests will be queued until an operation is completed. The default value is 8 and we recommend setting between 8 and 16 worker threads per processor.  If you are on a very busy system periodically check to see if the max used value is the same as the configured value. Worker threads are not dynamically allocated by the Server.

Maximum Size of Error Log: This setting limits the size of the error log (ads_err.adt or ads_err.dbf) to the size, in kilobytes, specified. When the error log reaches the specified size a third of the records are deleted and then reused.

Suppress Message Boxes: The Advantage service may sometimes display an error message in a dialog box. The most commonly occurs when a request to stop the service while users are still connected is received. This is not an issue if someone is logged into the server and can respond to the message. However, if the shutdown is done using a script there is no way to respond to the message box. When this setting is chosen any errors will be logged to the application event log instead of displaying a message box.

Disable Free Connections: This setting provides additional security by only allowing connections to a data dictionary on the server. This gives you the option to authenticate every user, if Logins Required is specified on the data dictionary. You can still access free tables located in the data dictionary path even though you are making a data dictionary connection.

Monday, November 3, 2008

Tip #1 – Get the Serial Number and Valcode for Your Advantage Server

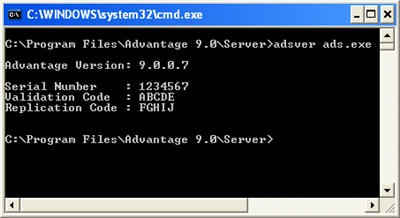
Advantage Database Server ships with a utility called adsver.exe which is installed in the server directory (C:\Program Files\Advantage 9.0\Server by default for version 9.0). This command line utility retrieves the Serial Number, Validation Code and Replication code from the server.

To use the utility open a command prompt and switch to the directory where the Advantage server is installed. Type in the following command: adsver ads.exe. This will read the license information from the server executable and return the data. Your output will look something like the screenshot below.

Adsver output

Adsver.exe has been included with Advantage since version 7.0.

Saturday, November 1, 2008

A Month of Tips

So I set an auspicious goal for November, I am going to publish an Advantage related tip every weekday. This should add up to 20 tips. These tips will fit into one of three categories for this first run. They are:

  • Server – Tips related to the Advantage Database Server in general
  • ARC – Tips related to Advantage Data Architect
  • SQL – Tips related to using Structured Query Language

Of course I can’t take all the credit for these tips. I gathered ideas from the Advantage Technical Support Team, Advantage R&D and of course the customers who I have been lucky enough to work with over the years.

I hope you find the tips interesting and useful and if you have some tips of your own feel free leave me a comment or send me an e-mail.