Wednesday, April 29, 2009

Tool for Viewing Table Properties

Last week I wrote a post about Memo Block Size which discussed using the AdsGetMemoBlockSize API. Since this is not reported directly in Advantage Data Architect I thought it might be useful to create a simple tool which will display this property.

I also thought that this small project might be a good way for me to further dust off my C coding skills. As it turns out this wasn't the best idea since I spent a lot more time on this project than I would have in C# or Delphi. However, I am hoping to become a more Pragmatic Programmer so I am spending some time in different languages. After a few false starts and a little help from my friends I was able to get my simple command line utility working.

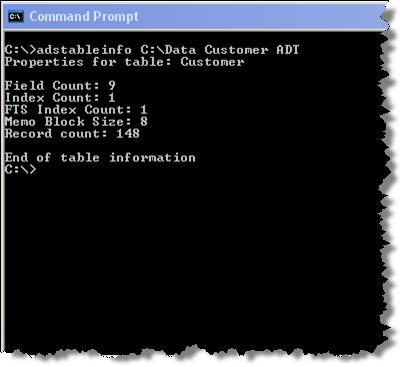
The tool connects to Advantage and opens the specified table. It then runs several API calls to get information about the table. In the first iteration I returned the following information: Field Count (AdsGetNumFields), Index Count (AdsGetNumIndexes), FTS Index Count (AdsGetNumFTSIndexes), Memo Block Size (AdsGetMemoBlockSize) and Record Count (AdsGetRecordCount). So here is iteration one:

TableInfo Iteration One

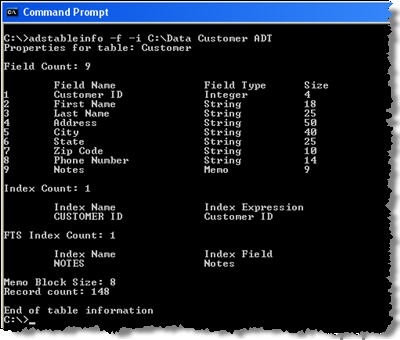
Of course, this did not seem like enough information to return. So for iteration two I added code to get all of the field names, types and sizes. I also added code to retrieve the index tag names and expressions. Of course this meant that I had to add some switches to show these options. So iteration two looked like this:

TableInfo Iteration Two

I am currently on iteration 3 which includes support for dictionary tables along with a verbose mode which displays additional index information. I'll have the tool posted on the DevZone by the end of the week.

Monday, April 27, 2009

Book Review – Head First Object Oriented Analysis and Design

HeadFirstOOAD-McLaughlin[2] The Head First series is an interesting approach to presenting technical material. It includes many different teaching styles within each book including; graphics, quizzes, exercises and a variety of presentation styles. This makes this series of books interesting to read and allows you to move through the material quickly.

Head First Object Oriented Analysis and Design (OOA&D) is the first Head First book I have read. The presentation style used throughout the book keeps the material interesting and easy to digest. I found myself reading through this book very quickly and I was impressed in how easy it was to remember the material from chapter to chapter. The frequent reviews and quizzes help to keep the information fresh in your mind as you work through the book.

Most of the examples in the book are written in Java so some familiarity with the language makes the examples easier to follow. However, the code is used to demonstrate the usefulness of objects and how they can relate to one another. Making it possible to still follow the design principals even if you don't know any Java at all. All of the examples follow the three steps to great software writing.

  1. Make sure your software does what the customer wants it to do
  2. Apply basic OO principals to add flexibility
  3. Strive for a maintainable, reusable design.

The first example in the book is a fictional guitar store. You are asked to design an application for managing the inventory of the store. Of course my first thought was to use a database, Advantage would be a good choice :), but the book uses classes instead of a database. The classes do an excellent job of demonstrating the Object Oriented principals described in detail throughout the book

In order to demonstrate more design principals we are presented the problem of creating a doggie door. Our door goes through several iterations demonstrating an incremental design and the importance of creating a flexible program to begin with. We then revisit our guitar store and find that the owner wants to sell different types of instruments. This allows for some refactoring of the original application.

The last section of the book discusses big problems. In this section we are asked to design a game framework. Using a "real world" example provides a framework for introducing the principals of design. First a feature list is created based on the customer's input. After the features are determined use cases are developed to ensure that the program will meet all the requirements. This process is broken into three sections, Architecture, Design Principals and Iteration and Testing

In the Architecture section the really big problem, in this case a game framework, is defined and broken down into smaller pieces. Once the pieces are determined it is time to determine how they will fit together. Things like deciding which pieces need to be built first and identifying dependencies. This is done through the three Q's of architecture.

  • Is it part of the essence of the system?
  • What the heck does it mean?
  • How the heck do I do it?

The design principals chapter discusses several principals including; The Open-Closed Principal (OCP), Don't Repeat Yourself (DRY)Principal, Single Responsibility Principal (SRP) and Liskov Substitution Principal (LSP). Each principal is summarized and a step-by-step example is given. The principals are reinforced with exercises after each principal using the examples from throughout the book. I found this chapter full of good information.

The iteration and testing chapter describes two basic iteration types. Focus on specific features, completing one piece of functionality at a time, or focus on specific flows, which complete a flow through the application with all the relative functions. The choice is yours to make but the authors suggest you choose the mechanism that makes your customer happy. Both these approaches are demonstrated by building the game framework which allows for a good discussion on testing.

The last chapter discusses the lifecycle and does a good job of wrapping all the concepts up into a nice package. This is highlighted by walking through three iterations of the game framework example. Again many exercises are provided in the chapter which reinforce the material in an entertaining way.

Make sure you check out the first appendix which is a collection of the top 10 things that are not discussed in detail in the book. These include things like Use Case Design, Unit testing and readable code. All of these topics could be examined in more detail but this chapter provides a good summary of each of the topics.

The bottom line: I found this book a very interesting read. I learned a lot from the book through the examples and detailed discussion of Object Oriented principals. I think that the unique approach used by the Head First series keeps the reader's interest and presents the material in several ways. The examples used throughout the book were interesting and did a good job of demonstrating the various principals. There is also a very complete appendix which gives a good overview of Object Oriented programming. This appendix was a great review of OO principals and could also serve as a quick introduction. I'll be reading more Head First books in the future.
Friday, April 24, 2009

Advantage with Delphi 2009 – Part 2

Advantage with Delphi - Part 2 The second screencast in the Using Advantage with Delphi 2009 demonstrates manipulation of data. A new form for inserting and editing data is added to the project. Although this can all be done through the grid control on the main form the second form demonstrates the use of the Insert, Edit and Post methods of the TAdsTable component.

The entire series will be posted in the Screencasts section of the DevZone. A list of all the individual screencasts is below:

  • Part 1 – Connecting and Viewing data
  • Part 2 – Inserting and Editing data
  • Part 3 – Filtering and Searching
  • Part 4 – Index Operations
  • Part 5 – Ranges and Seeks

You can also view the entire series on a single page.

Wednesday, April 22, 2009

Memo Block Size

While working on an issue involving memo block size I found out that this is not always an easy value to determine. The default memo block size for Advantage memo file (ADM) is 8 bytes. DBFs have two styles of memos FPT and DBF. The default memo block sizes for FPT files is 64 bytes and DBT files is 512 bytes.

There are two major implications of this memo block size. First the blocks determine how efficiently the data is stored. Every time there is more data stored in the memo than is available in the currently allocated blocks more blocks are added. Therefore a 65 character string in a memo field will take up the following space:

  • ADM – 9 Blocks 72 bytes
  • FPT – 2 Blocks 128 bytes
  • DBT – 1 Block 512 bytes

The default block size for ADTs make for a very efficient storage of data in the memo file. Although more blocks are required space is preserved since the blocks are smaller.

The second implication is the amount of data that can be stored in the memo file. There can only be 4,294,967,296 (4GB) of memo blocks in any memo file. Thus you can calculate the maximum size of the memo file by multiplying the block size times 4GB. For example maximum file size based on the defaults are:

  • ADM – 8 bytes X 4 GB = 32 GB
  • FPT – 64 bytes X 4 GB = 254 GB
  • DBT – 512 bytes X 4 GB = 2 TB

When you have a need to store large amounts of data in a memo file you may need to increase the memo block size. When the maximum number of memo blocks have been allocated a 7073 error will be returned. If you receive this error you can either pack the table to free up some of the memo blocks or create a new table with a larger memo block size. Valid memo block sizes are from 8 – 1024 bytes. This allows for a memo file size between 32 GB and 4 TB.

You can specify the memo block size when creating a table in ARC. The AdsCreateTable API includes a parameter to specify the memo block size. This option is also available when using the TAdsTable component for Delphi.

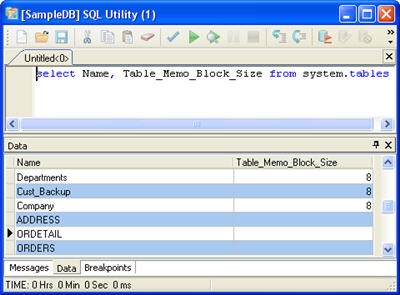
You can determine the current memo block size by using the AdsGetMemoBlockSize API function. This value is also available on dictionary bound tables within the system.tables system table. Only tables with associated memo files will report a value in the Table_Memo_Block_Size column.

MemoBlockSize

In most cases the default memo block size will be sufficient. However, if you expect to store a large amount of data (i.e. images, documents, etc…) in a table you may want to increase the memo block size when you create the table. Keep in mind that too large a block size can lead to inefficient storage.

Monday, April 20, 2009

Advantage Topic at LAFox User Group

Tomorrow night (21 April) Jay Hudson will discussing his experience with converting a Visual FoxPro application to use Advantage Database Server. His topic is entitled "Real World Advantage DB". He will discuss the following topics:

  • How to convert a Visual FoxPro Database container
  • Creating a new DBC with using the Advantage ODBC drivers
  • Running with both Free Tables and an Data Dictionary Tables
  • Using both Local and Remote (Database) Server

The LAFox User Group meets on the third Tuesday of each month at 7:30 PM. The meeting is held in Councilman Bill Rosendahl's Westchester office: 7166 W Manchester Ave 90045.


View Larger Map

We received a very warm welcome when we presented to the group back in February. If your in the LA area you should attend this meeting.

Friday, April 17, 2009

Advantage with Delphi 2009 Screencast Series

View the ScreenCast With Delphi Live coming up in about a month it was time to update our Delphi Screencasts. I have been working on a series of screencasts based on the example project outlined in our Delphi Getting Started guide. I will be posting one screencast each week over the next 5 weeks. So be sure to check back every Friday for the new screencast.

Part one will begin with creating a Delphi 2009 project and setting up the initial form. The form contains a DBGrid and DBNavigator control. It uses a TAdsConnection and TAdsTable component to access the data. You can view the screencast by clicking on the image .

The entire series will be posted in the Screencasts section of the DevZone. A list of all the individual screencasts is below:

  • Part 1 – Connecting and Viewing data
  • Part 2 – Inserting and Editing data
  • Part 3 – Filtering and Searching
  • Part 4 – Index Operations
  • Part 5 – Ranges and Seeks

You can also view the entire series on a single page.

Wednesday, April 15, 2009

Advantage with Delphi 2009

This week I have been working with Delphi 2009 and updating some Advantage examples. Support for Delphi 2009 was added in Advantage 9.1 and is also available for the latest 8.1 update (8.10.0.38).

My first project was to go through the Delphi Getting Started Guide using Delphi 2009. Even though the tutorial was written several years ago all of the steps work in the latest version of Delphi.

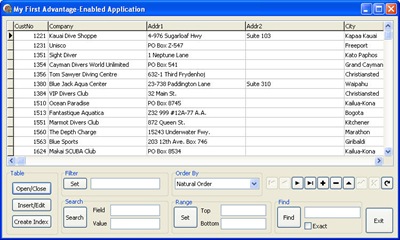
The example demonstrates connecting to Advantage and opening a table. The main form includes a grid for viewing the data as well as some other functionality. This includes filtering, searches, setting index orders, setting ranges and index seeks. A second form is used for inserting and editing individual records. A third form is used for creating indexes on the table.

Advantage Example Application

The source code for this sample application is available on Code Central.

I enjoyed working with Delphi 2009. Since I do a lot of development with Visual Studio I found the interface very easy to learn and work with. Delphi 2009 even provides several Visual Studio templates for various windows making it even more familiar for me. I like the ability to control the appearance of individual windows giving the developer the ability to customize the environment in many ways.

One thing that I did find a bit annoying was the Object Properties window. Whenever I ran my application in debug mode it would change the column widths making it difficult to read the individual property names. I am sure there is a way to preserve the column widths but I have not found it yet.

I will be working with Delphi 2009 and Delphi Prism over the next few weeks in preparation for Delphi Live.

Friday, April 10, 2009

Advantage and High Availability – Hot Standby

I did a posting on High Availability back in June which discussed Warm Standby. In this posting I wanted to discuss implementing the next level commonly referred to as Hot Standby. In a Hot Standby scenario there is virtually no user intervention required. If a server fails the Advantage service and associated data are automatically started on another server. This is usually accomplished using some type of cluster services and Advantage has been tested and works with Microsoft Cluster Services (MSCS).

I recently did two postings on installing Advantage on a Windows Cluster for both Windows Server 2003 and Windows Server 2008. I also did another posting on Virtual Windows Clusters. So without repeating myself too much I thought I would discuss some of the benefits of using a cluster for your high availability solution.

The key benefit of a Hot Standby solution is the fact that it automatically recovers from a server failure. When using a cluster Advantage is configured as an application that can be moved between the nodes of the cluster. This will automatically occur if the node running Advantage fails. There are two important things to keep in mind about this configuration.

First the drive where the data is being stored MUST be on a shared storage device. If the data is stored on a physical drive on the node running Advantage it will be unavailable if that node fails. Therefore all data that will be accessed needs to be on a shared drive. You should also configure Advantage to store all of it's log files on this shared drive as well.

Second the shared drive must be configured to be moved with the Advantage service. Otherwise the data will not be available to the new node running the Advantage service. The Advantage service should be setup so that it requires the data drive to be available before starting. The Windows 2008 Failover Clustering wizard has a step for adding a data drive when you create your Application Group. You must take an additional step when creating the Application Group with Windows Server 2003.

Although this process is more automated than a warm standby solution there are still an impact to clients. If a node fails then all data opened by all clients will be closed. When the Advantage service is started on another node it will automatically rollback any failed transactions and verify the integrity of all indexes. The client machines will most likely get a 6610 error and will have to restart their application(s). They will require no changes to their data path since the node that takes over the Advantage service will respond just like the prior node.

If you are connecting to Advantage using a web server, I recommend setting the RETRY_ADS_CONNECTS setting for the client. Although this will not preserve any state information about the tables it will allow the application to obtain a successful connection without a restart. By default the Advantage client caches any 6000 class errors and will continue to fail until it is restarted.

There is a white paper available if you would like more information about high availability with Advantage.

Wednesday, April 8, 2009

Getting Input Variables with SQL Stored Procedures

Advantage uses two system tables to handle the input and output variables. Each input variable is stored as a field in the __input table which can be accessed within your SQL script.

I prefer opening the __input table as a cursor and then using dot notation to access the various fields. If you need to manipulate the input values within your stored procedure then you may want to assign the input values to local variables. The code below demonstrates my preferred method which is using a cursor for the input table.

DECLARE @cInput CURSOR as SELECT * FROM __input; 
DECLARE @sCustName STRING;
 
// Open the __input table
OPEN @cInput;
// Fetch the first row, the __input table only contains a single  row
FETCH @cInput; 
 
// Values can be used via dot notation
@sCustName = SELECT LastName + ", " + FirstName FROM Customer
             WHERE CustID = @cInput.ID;
 
// Close the input table
CLOSE @cInput;

There are two ways to assign the input values to local variables. The first is to use a cursor like the example above and the second is to use an SQL statement on the __input table. The example below demonstrates these two methods.

DECLARE @var STRING;
 
// Using the cursor as declared above
@var = @cInput.field;
 
// Selecting the value from the __input table directly
// Note: the SET keyword is optional
SET @var = SELECT field FROM __input;

The performance of each of these methods is about the same so it is more a matter of personal preference. More information about using stored procedures with Advantage is available in the help file.

Friday, April 3, 2009

A Minion Shirt

TEM Shrit Back when we were attending VSLive! on a regular basis I used to see SourceGear exhibiting as well. So when I saw them again at TechEd last year I was impressed with their marketing approach. They had a Guitar Hero contest for discounts on their software. It was a cool way to appeal to the audience and promote the product at the same time.

They also have a new spin on the traditional t-shirt giveaway. To get one of their Evil Mastermind minion t-shirts you need to post a picture of yourself in the shirt. So I e-mailed in my request and I was rewarded with a shirt. So now I have fulfilled my part of the bargain.

As an added bonus I even downloaded their version control software Vault. It is free for one user and I have been using it with the various sample and test applications that I write. It integrates seamlessly into Visual Studio and I have found it very easy to use.

Thanks to Eric for this great t-shirt.

Wednesday, April 1, 2009

FAQs – March 2009

Server-Side Alias on Linux

A server-side alias is a mechanism for allowing access to data through the Advantage server without creating a network share. The aliases are stored in a file named adserver.ini which must be stored in the error log path (default /var/log/advantage). This path is specified in the Error and Assert Log Path setting in the ads.conf file.

Using server-side aliases is Aliases are specified under the ServerAliases heading. The syntax is <name>=<path> see the example below:

[ServerAliases]
MyApp=/usr/local/myapp
Medical=/usr/local/medapp

The Advantage server caches the contents of the adsserver.ini file for performance reasons but this cache is updated when the file is changed.

Dictionary Passwords

To ensure the security of user passwords Advantage uses a certificate mechanism for authentication. A certificate is generated by the client based on the user entered password. The server verifies this certificate based on the password stored in the dictionary. If the information is correct the server generates a certificate which is passed back to the client. Once the client verifies the authenticity of the certificate the authentication process is completed. The password is never sent across the network in an unencrypted form.

The user password is encrypted with a one-way hash and stored in the data dictionary. With one-way hash, we can only verify the correctness of the supplied password but we do not have the password in clear text except the one supplied by the users.

Clipper Clients with Exclusive Proprietary Locking

With version 9.1 of Advantage Database Server our proprietary locking has changed slightly. This new implementation does not work with Clipper based applications. The first Clipper application will successfully connect to Advantage and be able to open and manipulate tables. However, other users will not be able to use the tables and other instances of the application will fail.

Clipper implements rights checking by trying to physically open the file which succeeds on the first attempt but fails on the second attempt thus causing the error. Advantage 32-bit clients check the rights to the file through the operating system. With non-exclusive proprietary locking the file was able to be opened read-only so no error was returned.

There are two solutions to this issue you can turn off rights checking or revert to using non-exclusive proprietary locking. I recommend that you turn off rights checking using the following command ax_rightschecking(.f.). This way the application will not attempt to open the file directly and will use Advantage to open the tables.

To use non-exclusive proprietary locking you must set the NONEXCLUSIVE-PROPRIETARY-LOCKING property to 1. For details on setting this property on the various Advantage servers refer to the help file.

ADS Backup Utility Options

Advantage ships with a command line backup utility program that can be used to create backups and restore databases. This tool has many options for customizing the behavior of the backup. Three new options have been added in version 9.

  • Specify a table type map (-w)
  • Don’t create the output table if no errors are logged (-x)
  • Specify a username (-y)

When backing up a directory of free tables that contains more than one table type you had to perform a backup for each table type. With 9.x you can specify multiple table types to ensure that all tables are backed up with one pass.

In version 8.x the utility always saved the results of the backup to a file even if no errors were reported. By specifying the –w option the results will only be saved when warnings or errors are logged during the backup.

Version 9 also introduced database roles which include a DB:Backup group. Members of this group have permission to backup the database in addition to the administrative user (adssys). You can specify the username for a user in the DB:Backup group using –y, specify the password using –p.