Friday, July 31, 2009

Tip #60 – AdsBackup Utility Options

The AdsBackup utility is a command line tool that ships with the Advantage Sever and is located in the server directory, C:\Program Files\Advantage 9.10\Server by default. This utility has several options which can be specified to customize how your backup or restore is performed. The basic command line is below.

adsbackup [options] password> <source> [file mask] <destination>

Below is a list of the most commonly used options.

  • -a  Prepare data for a differential backup
  • -d  Don't overwrite existing tables
  • -f  Perform a differential backup
  • -i  Include file list
  • -e  Exclude file list
  • -m  Backup metadata only
  • -p  Password
  • -r  Restore the data
  • -w  Table type map
  • -y  Username for dictionary connection (adssys if not specified)

All of the details about the adsbackup command line tool, along with information about a java version, is available in the help file.

Thursday, July 30, 2009

Tip #59 – Backup and Restore Options

There are several options that can be used when backing up or restoring a database. Some of these were shown in other tips, however, I thought I would highlight them in a single spot.

  • PrepareDiff – Prepares ADT tables for a differential backup
  • Diff – Performs a differential backup
  • Include – Includes specified tables
  • Exclude – Excludes specified tables
  • DontOverwrite – Will not overwrite existing tables
  • MetaOnly – Only backs up the table structures no data
  • TableTypeMap – Defines the types of tables ( i.e. ADT, CDX ) when backing up or restoring free tables

These options are specified in the options parameter of the system procedures. Multiple options are delimited by using a semi-colon ( ; ). Lists of items ( i.e. Include, Table Type Map ) are delimited by commas ( , )

Exclude=_Remote1;PrepareDiff

For a full description of all of the options refer to the help file.

Wednesday, July 29, 2009

Tip #58 – Restoring Data

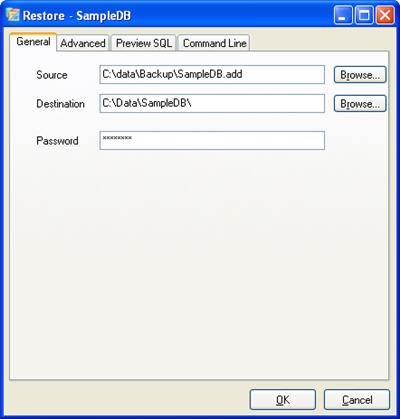
If you have some kind of failure that requires you to use a backup you must restore it. Restoring a data dictionary or set of free tables ensures all the data is ready for use. The restore process rebuilds all of the indexes and copies the data to the destination. You can restore data using Advantage Data Architect by right-clicking on an active connection and choosing Restore…

Like backing up data the restore requires a source and destination path. If you are restoring a data dictionary you must provide the adssys password for the dictionary. Choosing Restore… in ARC will bring up the Restore dialog.

ARC_Restore

You can select specific tables to restore from the list displayed on the Advanced tab. Like the Backup dialog the Preview SQL and Command Line tabs display syntax for using the system procedures or command line utility respectively. An example of using sp_RestoreDatabase, sp_RestoreFreeTables and the adsbackup utility are below. The examples are shown without any options specified

EXECUTE PROCEDURE sp_RestoreDatabase( 'C:\Data\Backup\SampleDB.add', 'password', 'C:\Data\SampleDB\SampleDB.add', NULL )

EXECUTE PROCEDURE sp_RestoreFreeTables ( 'C:\Data\Backup', 'C:\Data\FreeTables', NULL, NULL )

adsbackup –r –ppassword "C:\Data\Backup\SampleDB.add" "C:\Data\SampleDB\SampleDB.add"

Tuesday, July 28, 2009

Tip #57 – Creating a Differential Backup

A differential backup identifies the records that have changed since the last backup and updates an existing backup. This is different than an incremental backup, in that each differential backup is not stored as a separate file. Since the differences are applied to an existing backup you only have to restore once. Configuring a differential backup is a three step process.

  1. Create a full backup of your database/free tables
  2. Prepare the database/tables for a differential backup
  3. Perform a differential backup

You must have a full backup ( see tip #56 ) of the data prior to performing a differential backup. Once the full backup has been performed the database/tables must be prepared for a differential backup. This only needs to be performed once unless the table structures change or new tables are added. You prepare the data for a differential backup by specifying the PrepareDiff option.

EXECUTE PROCEDURE sp_BackupDatabase ( 'C:\Data\Backup', 'PrepareDiff' )

EXECUTE PROCEDURE sp_BackupFreeTables ( 'C:\Data\FreeTables', '*.ADT', 'C:\Data\Backup', 'PrepareDiff', NULL )

Now that a full backup has been performed and the data has been prepared subsequent backups can be performed with the Diff option. This will only backup the records that have changed since the last backup.

EXECUTE PROCEDURE sp_BackupDatabase ( 'C:\Data\Backup', 'Diff' )

EXECUTE PROCEDURE sp_BackupFreeTables ( 'C:\Data\FreeTables', '*.ADT', 'C:\Data\Backup', 'Diff', NULL )

Note: When running the sp_BackupDatabase system procedure you must be connected to the data dictionary as adssys or a user who is a member of either the DB:Admin or DB:Backup group.

Monday, July 27, 2009

Tip #56 – Using Advantage Online Backup

Advantage online backup is a powerful tool for ensuring that you have a copy of your database if your primary database gets lost. Online backup allows administrative and backup users the ability to create a backup of a database or set of free tables while the tables are open. It does not interfere with any current operations which may be occurring on the data.

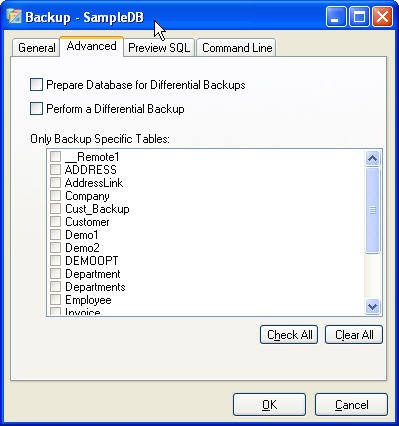
You can start an online backup in ARC by right-clicking on a open connection in the connection repository and choosing the Backup… menu item. This will open the Backup dialog. First enter a destination for the backup, this can be any location that the server can get to. Remember that by default the Advantage service runs as the SYSTEM user account which may not have rights to network shares. After you have specified the backup location click the Advanced tab to select any additional options.

ARC_BackupAdvanced

If your database contains a lot of data and you are using ADT tables, it may be beneficial to do differential backups ( see tip #57 ). If you only want to backup specific tables simply select the tables you wish to backup. The Preview SQL tab shows the syntax for either the sp_BackupDatabase or sp_BackupFreeTables system procedures. The Command Line tab shows the syntax for calling the adsbackup utility with the specified options.

Bonus Tip: If you want to backup all but a few of your tables, for instance all but your replication queue tables, use the exclude option when calling sp_BackupDatabase or the adsbackup utility. The backup dialog creates the code using the include syntax.

EXECUTE PROCEDURE sp_BackupDatabase( 'C:\Data\Backup', 'exclude=__Remote1' )

EXECUTE PROCEDURE sp_BackupFreeTables ( 'C:\Data\FreeTables', '*.ADT', 'C:\Data\Backup', 'exclude=Demo1', NULL )

adsbackup –ppassword –e__Remote1 "C:\Data\SampleDB\SampleDB.add" "C:\Data\Backup"

Friday, July 24, 2009

Tip #55 – Pausing Replication

With the release of Advantage 9 the ability to pause replication was added. When replication has been paused all changes to the tables are still added to the queue table, but the changes are not sent to the subscriber(s). You can also disable replication which will no longer track changes.

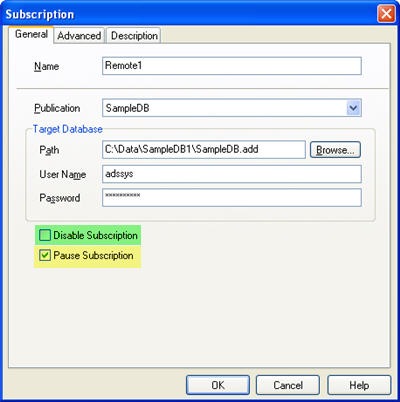
You can pause replication in several ways. The easiest way is to open the data dictionary in ARC, right-click on the subscription you wish to pause and choose Pause from the context menu. You can also open the subscription properties page. From here you can disable or pause the subscription.

Subscription Properties

You can also pause or disable a subscription using a system procedure. Since these options are properties of the subscription object you need to use the sp_ModifySubscriptionProperty system procedure. Examples of pausing and disabling a subscription are below.

EXECUTE PROCEDURE sp_ModifySubscriptionProperty( 'Remote1', 'PAUSE', 'TRUE' )
 
EXECUTE PROCEDURE sp_ModifySubscriptionProperty( 'Remote1', 'ENABLED', 'FALSE' )

Thursday, July 23, 2009

Tip #54 – Design a Table within the Delphi IDE

Delphi_TableEdit Advantage Data Architect includes a table designer which allows you to create and modify tables in a graphical interface. You can access this table designer directly from the Delphi IDE. You can access the table designer by right-clicking on a tAdsTable component and choosing "ALTER/Restructure Table…"

The Table Designer will be opened and you can use it to restructure the table, modify constraints (for dictionary based tables) and add or modify indexes.

ARC Table Designer

Wednesday, July 22, 2009

Tip #53 – Dynamically Assigning a DataSet to a Report

You can use an existing DataSet as the data source for the a Crystal Report from Visual Studio. First you must add a DataSet to you project. This DataSet can contain one or more tables and can be used by several reports.

Crystal_DataSource

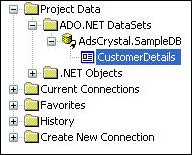
In order to use the DataSet you will need to create a Crystal Report that uses it as a data source. This is done using the Database Expert or when creating the report using the new report wizard. All of the DataSets in your project will be listed under Project Data –> ADO.NET DataSets. In my case I created a DataSet called SampleDB which contains the CustomerDetails view. By using a table from the existing DataSet I can now pass any table that matches the structure defined in the DataSet.

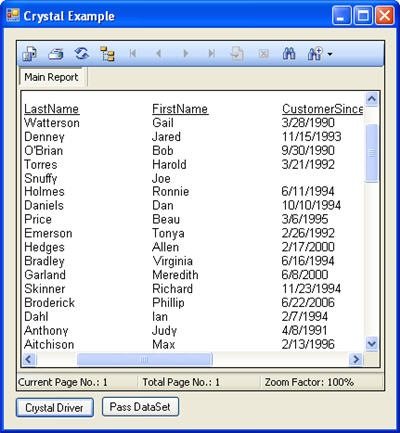
With the DataSet and report created we can now use an SQL command to filter the data for the report. For this example we create a new AdsConnection, AdsDataAdapter and DataSet objects. The DataAdapter will use a command object to retrieve the data from the database. The DataAdapter is then used to fill the DataSet and finally this new DataSet is passed as the data source for the report.

   1: DynamicReport myReport = new DynamicReport();
   2: AdsCommand cmd;
   3: AdsDataAdapter da;
   4: DataSet dsCust;
   5:  
   6: try 
   7: {
   8:     // Open the connection 
   9:     cnAds.Open();
  10:     
  11:     // Create the command, dataadapter and fill the dataset
  12:     cmd = cnAds.CreateCommand();
  13:     cmd.CommandText = "SELECT * FROM CustomerDetails WHERE CustNum < 10020";
  14:     da = new AdsDataAdapter(cmd);
  15:     dsCust = new DataSet();
  16:     da.Fill(dsCust);
  17:     
  18:     // Open the report using the current dataset
  19:     myReport.SetDataSource(dsCust.Tables[0]);
  20:     crvTest.ReportSource = myReport;
  21:     crvTest.RefreshReport();
  22:     
  23:     // Close the connection
  24:     cnAds.Close(); 
  25: }
  26: catch (AdsException aex)
  27: {
  28:     MessageBox.Show(aex.Message, "Advantage Error");
  29: } 

I would recommend using this technique which allows you more flexibility. For example you could use this method to allow users to print a set of data which they have filtered.

Tuesday, July 21, 2009

Tip #52 – Opening a Crystal Report with Visual Studio

Using Crystal Reports from Visual Studio is relatively simple. A lightweight version of the Crystal Reports runtime and designer is included with Visual Studio allowing you to create reports within the IDE.

To create a report that uses the Advantage Crystal Reports driver you must configure your settings as outlined in Tip #51. If you do not have the full version of Crystal Reports you may need to manually copy the Advantage Crystal Driver ( crdb_ads.dll ) into the proper directory. On my system this path is: C:\Program Files\Business Objects\Common\2.8\bin.

Crystal reports can be displayed in your application using the CrystalReportViewer control. You create an instance of the report you wish to load into the viewer and then set the ReportSource property. You can use a report you created directly in Visual Studio or load an existing report.

   1: // Use a Report that is part of the project
   2: Report myReport = new Report1();
   3:  
   4: // provide login
   5: myReport.SetDatabaseLogon("adssys", "");
   6:  
   7: // Display the report in the viewer
   8: crvTest.ReportSource = myReport;

Loading a Crystal Report in VS

Monday, July 20, 2009

Tip #51 – Using the Advantage Crystal Reports Driver

The Advantage Crystal Reports Driver version 9.1 supports the following versions of Crystal Reports.

  • Crystal Reports version 9
  • Crystal Reports version 10
  • Crystal Reports version 11
  • Crystal Reports version 11 R2
  • Crystal Reports 2008

To use the driver you must have the Advantage Driver ( crdb_ads.dll ) in the Crystal Reports Bin Directory. Running the Crystal Reports driver install should place the driver in the proper directory.

After the driver has been properly installed you must create an ADS.INI file in the C:\Windows directory which contains a Server Type and one or more Database Aliases. The server type is specified by an integer value; 1 = Local Server, 2 = Remote Server, 3 = Remote or Local, 4 = Internet, 5 = Internet or Local, 6 = Remote or Internet and 7 = All server types.

The database alias is defined by a name, path and file type. The file type can be one of the following: C = DBF/CDX, A = ADT/ADI, V = VFP, D = Dictionary ( NTX index types are not supported with the Crystal Reports Driver ). The example ADS.INI below allows for Remote connections and shows  CDX, ADT and Dictionary aliases.

[Settings]
ADS_SERVER_TYPE=2

[Databases]
MyADT=C:\Data\FreeTables;A
MyDBF=C:\Data\DBFFiles;C
Sample=C:\Data\SampleDb\SampleDb.add;D

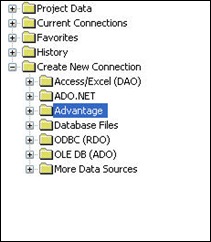
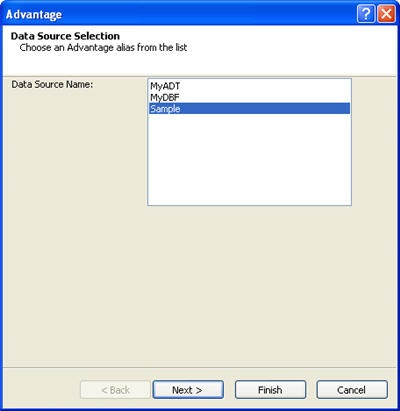
Crystal_DataSources Once your INI file has been saved you can use the Crystal Database Expert to select your data source. Go to the Create New Connection item in the tree view. With the Advantage Crystal Driver installed you should see an Advantage folder in the tree view. When you click on the Advantage folder it will open up a Data Source Selection dialog which will list the alias names you have configured in your INI file. If you select a data dictionary connection click the Next > button to enter the database credentials you wish to use. Clicking Finish will connect to the data and retrieve the list of tables which you can now use within your report.


Available Advantage data sources

You can now develop your Crystal Report using the data from Advantage. When you distribute this report you must ensure that the Advantage Crystal Driver is included with your install and that it is available to the Crystal Reports Runtime. The ads.ini file with your Server Type and Database Aliases must also be in the path so the driver can use it.

Friday, July 17, 2009

Tip #50 – Working with Connection Events

The AdsConnection object has two events which can be monitored for activity. These include the InfoMessage and StateChanged events. The InfoMessage event is triggered whenever a warning message is sent from the server. The StateChanged event is fired each time the connection state changes.

In order to capture these events an event handler must be assigned for the events. You must first create a function which can handle the output of the event you wish to respond to. Then you must register this function as the event handler with the AdsConnection object. The example below shows code for both the InfoMessage and StateChanged events in C#.

   1: // State change event handler
   2: private void OnConnectionStateChange(object sender, StateChangeEventArgs args)
   3: {
   4:     lblOrigState.Text = args.OriginalState.ToString();
   5:     lblNewState.Text = args.CurrentState.ToString();
   6: }
   7:  
   8: // Warning message event handler
   9: private void OnWarningMessage(object sender, AdsInfoMessageEventArgs args)
  10: {
  11:     lblWarning.Text = args.Message;
  12: }
  13:  
  14: private void Form1_Load(object sender, EventArgs e)
  15: {
  16:     // setup the connection object
  17:     cnADS = new AdsConnection();
  18:  
  19:     // Add the event handler
  20:     cnADS.StateChange += new StateChangeEventHandler(OnConnectionStateChange);
  21:     cnADS.InfoMessage += new AdsInfoMessageEventHandler(OnWarningMessage);
  22: }

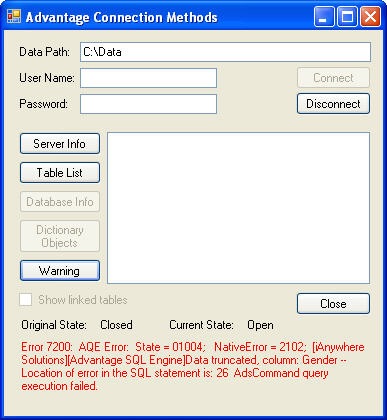
When the StateChanged event is fired the OnConnectionStateChange function is called. This function updates the contents of two label controls with the state descriptions. Similarly, the InfoMessage event will execute the OnWarningMessage function which will put the warning message into another label control. For the example I created an UPDATE statement that inserts a string value that is too long for the field I am updating.

Connection Events

When the Connect button is pressed the AdsConnection.Open() method is called. If successful the StateChanged event is fired and the labels ( Original State and Current State ) are updated. Since the connection is open the Current State is Open and the Original State was Closed.

Clicking the Warning button executed an UPDATE query which provided a string value that was too long for the field being updated resulting in a data truncation warning. This fires the InfoMessage warning which runs the OnWarningMessage function which places the warning message in the label on the bottom of the form.

Thursday, July 16, 2009

Tip #49 – Retrieving Database Objects

You can get a list of tables on a data dictionary connection using the GetTableNames ( see Tip #47 ) method. However, if you want to get a list of views, users or stored procedures you need to use the GetDDObjects method. This method can return any of the database objects as defined in the AdsObjectType enumeration.

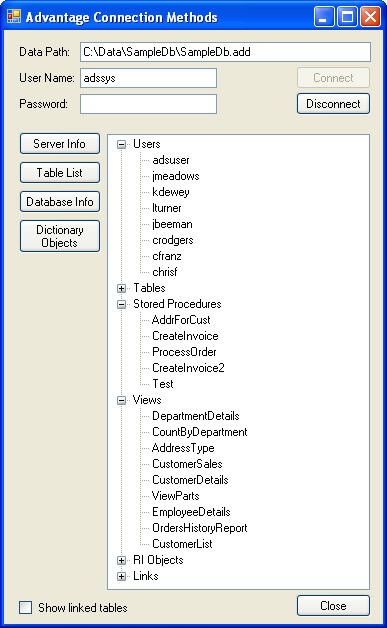
The screenshot below shows all of the main object types in a tree view control.

Dictionary Objects

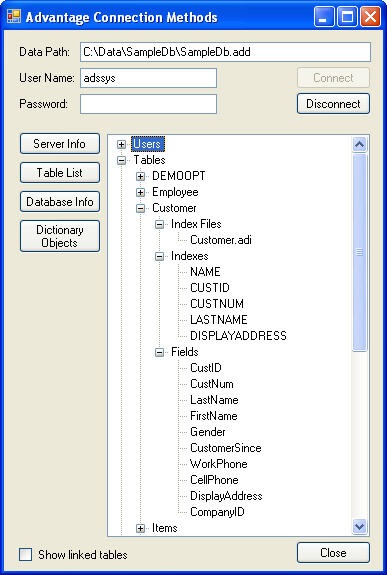
The function takes two arguments the AdsObjectType and the Parent Name. The parent name is only required when getting a list of sub-objects, for lack of a better term. These include the Index File, Index and Field object types. These objects are all associated with a table object. When the table object is expanded in the sample application these new object types are shown as sub items.

Dictionary Table Objects

Note: Currently Groups, Functions, Publications and Subscription objects cannot be retrieved using the GetDDObjects method.

Wednesday, July 15, 2009

Tip #48 – Get Database Info from AdsConnection Object

Along with the server properties the AdsConnection object also has several properties that are populated when a connection to an Advantage Data Dictionary is made. One of the most useful properties is the IsDictionaryConn property. This returns true whenever a connection to a data dictionary is made.

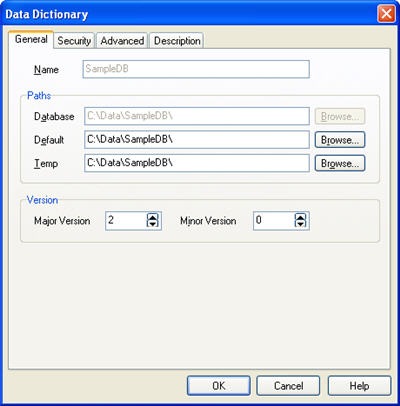
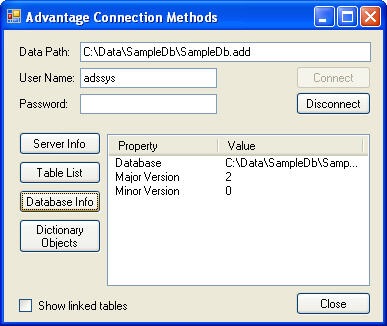
With a dictionary connection you can view the database name, major and minor versions. The database name contains either the full path to the ADD file or the contents of the initial catalog connection string property. The major and minor versions are stored in the data dictionary and can be configured in ARC or by using SQL Commands.

Data Dictionary Properties

The database name is returned as a string and the version properties are retuned as integer values. See the example below.

Database Info

Tuesday, July 14, 2009

Tip #47 – Getting a List of Tables on a Connection

There are several ways to list the tables (files) on an Advantage Connection. When connected to a data dictionary you can use system.tables which returns a list of all the tables contained within the database. You can also use regular file operations to get the contents of the data folder. However, your user may not have rights to the directory where the data resides so a file operation may fail.

The AdsConnection object has a method GetTableNames which will return a string array of all the table names available on the current connection. This list will be returned regardless of the permissions that the user has to the directory. In fact it will even work when the user has no access to the folder at all.

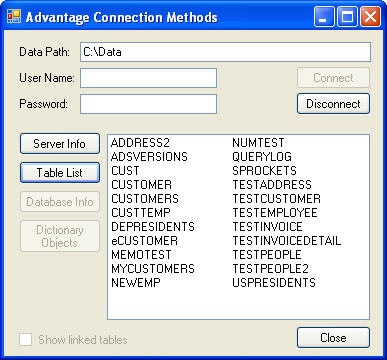
When using the GetTableName function on a free table connection you can filter the results based on the file extension. You simply provide a mask of the file types you wish to display. For instance if you only wanted to see the DBFs available on the connection you would provide the "*.dbf" mask ( ex: cnAds.GetTableNames( "*.dbf" ) ). The default is to provide all of the table names for the table type specified in the connection string, ADT is the default table type.

Free Table List

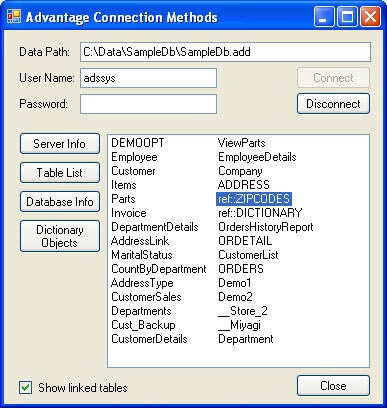
When using GetTableNames on a dictionary connection you can see all of the tables in a linked dictionary by providing a Boolean value ( ex: cnAds.GetTableNames( true );  ). Linked tables will be shown in the following format <LinkName>::<TableName>. Linked tables are not listed by default.

Data Dictionary Tables with Links

Monday, July 13, 2009

Tip #46 – Getting Server Information from an AdsConnection Object

The AdsConnection object in the Advantage .NET Data Provider has many properties which provide information about the server it is connected to. With an active connection you can get the following information: Server Name, Server Type, Server Version, Server Time, Connection Handle, Connection Timeout and Date Format.

These properties can be easily accessed once the connection is opened and used within your application. For example you may wish to have your application verify that a specific version of Advantage is running you could do this with the following code.

   1: // Build the connection string
   2: string sConn = "Data Source=C:\data;ServerType=Remote";
   3:  
   4: // Connect to Advantage
   5: AdsConnection cnADS = new AdsConnection( sConn );
   6: cnAds.Open();
   7:  
   8: // Compare the server version
   9: string sVersion = "9.10.0.9";
  10: if ( sVersion.CompareTo(cnAds.ServerVersion) != 0 )
  11:   MessageBox.Show( "You must have Advantage version " + sVersion, "Invalid Version");

There is a sample application posted on CodeCentral which demonstrates retrieving all of the server properties through the AdsConnection object. The server information is shown below:

Server Information

Friday, July 10, 2009

Tip #45 – Modifying Table Properties

A dictionary bound table has many additional properties that can be configured. These include:  Auto Create, Primary Key, Default Index, Permission Level, Memo Block Size and Validation Expression. These properties can be set using either the sp_ModifyTableProperty system procedure or AdsDDSetTableProperty API call.

The sp_ModifyTableProperty takes five parameters: Table Name, Property, Value, Validation Option and Fail Table. I recommend using the RETURN_ERROR validation option, this ensures that you do not loose any data if the modification fails. You can also use APPEND_FAIL which will write any records that do not meet the new criteria to the specified fail table. This option is useful when modifying the validation expression.

One of the most useful table properties is the Auto Create option. When set to true the table will be created when it is first opened if it does not exist. This can make deploying an empty data dictionary very simple since you only have to send the dictionary files. The auto create option also creates all indexes associated with the table. This can be very handy if you somehow loose your CDX or ADI file.

The following statement sets the auto create flag to true for the department table. An example SQL script which will change the auto create flag on all the tables is included in this tech-tip.

EXECUTE PROCEDURE sp_ModifyTableProperty( 'Department', 'TABLE_AUTO_CREATE', 'TRUE', 'RETURN_ERROR', '' )

The AdsDDSetTableProperty API call requires the following parameters: Connection Handle, Table Name, Property ID, Property Value, Property Length, Validate Option and Fail Table. Although similar to the sp_ModifyTableProperty call there are two additional parameters a connection handle and a property length. The property length is the length of the property value to assign.

The following code sets the auto create property to true.

   1: // Connect to the dictionary
   2: ADSHANDLE hConn;
   3: AdsConnect60( "C:\\Data\SampleDB\\SampleDB.ADD", ADS_REMOTE_SERVER, "ADSSYS",
   4:               NULL, ADS_DEFAULT, &hConn );
   5:  
   6: // Set the auto create property to true
   7: AdsDDSetTableProperty( hConn, "Department", ADS_DD_TABLE_AUTO_CREATE, "TRUE", 
   8:                        5, ADS_VALIDATE_RETURN_ERROR, NULL ); 
   9:  
  10: // Disconnect
  11: AdsDisconnect( hConn );

You must connect to the data dictionary with a user who has the right to alter tables in the dictionary in order to use either of these functions.

Thursday, July 9, 2009

Tip #44 – Altering Table Structure

Tables can be altered using the ALTER TABLE statement. This is a very powerful SQL statement because it allows for changing so many things about the table. You can ADD, ALTER and DROP columns (fields) and constraints defined in the table. Another overlooked feature of this command is the ability to change the position of various fields in the table.

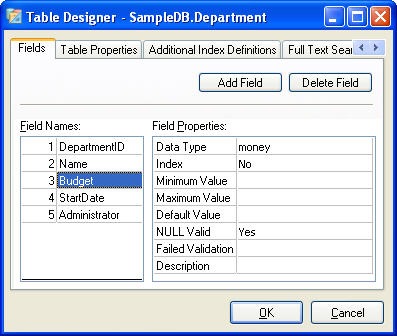
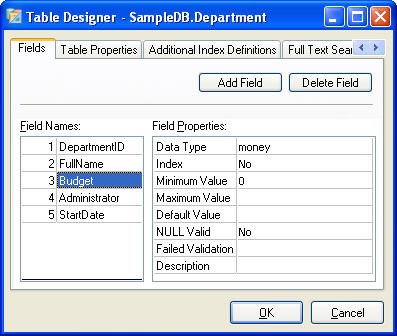
The following statement alters the original structure of the Department table pictured below:

 Original Department Table

ALTER TABLE Department
  ALTER COLUMN Name FullName char(50) CONSTRAINT NOT NULL
  ALTER COLUMN Budget Budget money CONSTRAINT NOT NULL CONSTRAINT MINIMUM '0'
  ALTER COLUMN Administrator Administrator integer POSITION 4

The altered table structure is shown below. Notice that the Name field is now FullName, the Budget field has a Minimum Value and NULL Valid is now No. Finally the Administrator and StartDate fields have changed positions.

Altered Department Table

Wednesday, July 8, 2009

Tip 43 – Removing Tables from a Dictionary

There are several ways to remove a table from a data dictionary. Tables can be removed using the DROP TABLE SQL statement and using the AdsDDRemoveTable API.

The DROP TABLE statement removes the table from the dictionary and deletes all of the table files, including memos and indexes. You can use the FROM DATABASE combined with the NO_DELETE option to remove the table from the data dictionary without deleting the files. This is the default behavior in ARC.

   1: // Remove the table from the dictionary and delete the files
   2: DROP TABLE Person
   3:  
   4: // Remove the table from the dictionary but keep the files
   5: DROP TABLE Person FROM DATABASE NO_DELETE

The AdsDDRemoveTable API works in much the same way. There are three parameters; Connection Handle, Table Name and a delete files flag.

   1: // Connect to the dictionary
   2: ADSHANDLE hConn;
   3: AdsConnect60( "C:\\Data\SampleDB\\SampleDB.ADD", ADS_REMOTE_SERVER, "ADSSYS",
   4:               NULL, ADS_DEFAULT, &hConn );
   5:  
   6: // Remove the department table and its files
   7: AdsDDRemoveTable( hConn, "Department", TRUE )
   8:  
   9: // Disconnect
  10: AdsDisconnect( hConn );

You must connect to the data dictionary with a user who has the right to drop tables in the dictionary in order to use either of these functions.

Tuesday, July 7, 2009

Tip 42 – Adding Tables to a Dictionary

You can add an existing table to a data dictionary using the sp_AddTableToDatabase system procedure or using the AdsDDAddTable API call.

To use the sp_AddTableToDatabase you must specify the following; Table Name, Table Path, Table Type, Character Type, Index File(s) and Comments. The table path can be a UNC path or relative path to the dictionary, however, the table must be on the same drive as the database otherwise a 7041 error will occur. The table type is specified as an integer value: 1 DBF/NTX, 2 DBF/CDX, 3 ADT and 4 VFP. Likewise the character types are 1 ANSI and 2 OEM, however this setting will be overridden if a dynamic collation has been specified.

The following statement adds the Department table to the data dictionary specified on the current connection.

EXECUTE PROCEDURE sp_AddTableToDatabase( 'Department',  'C:\Data\Department.adt', 3, 1, NULL, 'Test of sp_AddTableToDatabase' )

The AdsDDAddTable API takes a connection handle to a data dictionary and then the same parameters as the system procedure.

   1: // Connect to the dictionary
   2: ADSHANDLE hConn;
   3: AdsConnect60( "C:\\Data\SampleDB\\SampleDB.ADD", ADS_REMOTE_SERVER, "ADSSYS",
   4:               NULL, ADS_DEFAULT, &hConn );
   5:  
   6: // Add the department table
   7: AdsDDAddTable( hConn, "Department", "C:\\Data\\Department.adt", ADS_ADT,
   8:                ADS_ANSI, NULL, "Test of sp_AddTableToDatabase" );
   9:  
  10: // Disconnect
  11: AdsDisconnect( hConn );
You must connect to the data dictionary with a user who has the right to Create tables in the dictionary in order to use either of these functions.