Friday, October 29, 2010

Advantage Web API with Windows Phone 7

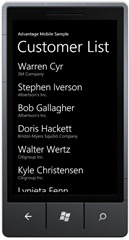
AdsWeb_WP7_Example Earlier in the week I discussed using the Advantage Web API with Windows Mobile 6 (WM6) in this post I will be discussing using the API with Windows Phone 7 (WP7). The techniques are very similar for both platforms. However, there are several differences with Microsoft's latest mobile platform.

Most notably WP7 applications are written in Silverlight or XNA which are both much different than the Windows Forms model used by WM6. The Silverlight libraries do not include any functions for creating a custom certificate handler, therefore you must use a valid certificate or register your self-signed certificate on the phone. I haven't found a good way of doing this yet so for now I am doing all my testing without SSL. However, you should always use SSL in a production environment.

The mechanism for retrieving data from the Advantage Web API is quite similar to the mechanism used with WM6. For WP7 I will once again use a JSON serializer and a custom class/object to work with the data on the device. Creating the class for the deserializer to work with is very similar to the one I discussed last week. The classes will use the System.Runtime.Serialization library I used an article by Nick Harris as my starting point. The class for the customer summary is below.

[DataContract]
public partial class CustomerSummary : BaseMyContent
{
  [DataMember]
  public string CustomerID { get; set; }
  [DataMember]
  public string CustomerName { get; set; }
  [DataMember]
  public string CustomerCompany { get; set; }
}

Web requests from WP7 are done in an asyncronous manner making the code a bit more complex than making a request with WM6. Additionally Microsoft provides a JSON serializer which is found in the System.Runtime.Serialization.Json library, which can be used to populate the data classes. I'll be using this serializer instead of the JSON.NET libraries.

private void GetData(string URL)
{
  var request = WebRequest.Create(HttpUtility.HtmlEncode(URL)) as HttpWebRequest;
  request.Accept = "application/json";
  request.Headers["Authorization"] = "Basic " + 
          Convert.ToBase64String(Encoding.UTF8.GetBytes(settings.Credentials));
  request.BeginGetResponse(RequestCallback, request);
}

void RequestCallback(IAsyncResult response)
{
  var request = response.AsyncState as HttpWebRequest;
  resp = request.EndGetResponse(response);
            
  if (resp != null)
  {
    var jsonSerializer = new DataContractJsonSerializer(typeof(BaseJSONResult));

    using (var stream = resp.GetResponseStream())
    {
      customerList = jsonSerializer.ReadObject(stream) as BaseJSONResult;
    }

    if (invoiceList.Result != null)
    {
      nextInvoices = invoiceList.Result.NextLinkUri;
      this.Dispatcher.BeginInvoke(() => DataRetrieved());
    }
    else
    this.Dispatcher.BeginInvoke(() => HandleError(invoiceList.Error.ErrorMessage.Value));
  }
}

void DataRetrieved()
{
  PageTitle.Text = "Invoice List";
  listboxCustomers.ItemsSource = customerList.Result.MyContents;
}

void HandleError(string errMessage)
{
  MessageBox.Show(errMessage);
  NavigationService.GoBack();
}

Since the request is processed asyncronously we need to use an Invoker to interact with the UI, hence the this.Dispatcher.BeginInvoke calls. Now that we have the results stored in our class we can now display the data. This is done by setting the ItemsSource property of the listbox and then binding the fields to the controls within the listbox. The xaml for the listboxCustomers is below.

<grid grid.rowspan="2" margin="12,149,12,12" x:name="ContentPanel">
  <listbox margin="0,0,-12,0" x:name="MainListBox" height="607"               selectionchanged="MainListBox_SelectionChanged" itemssource="{Binding Items}">
  <listbox.itemtemplate>
    <datatemplate>
        <stackpanel margin="0,0,0,17" width="432">
          <textblock textwrapping="Wrap" text="{Binding CustomerName}" />
          <textblock margin="12,-6,12,0" textwrapping="Wrap" 
                        text="{Binding CustomerCompany}" />
        </stackpanel>
      </datatemplate>
    </listbox.itemtemplate>
  </listbox>
</grid>

Wednesday, October 27, 2010

Advantage Data Class

As I mentioned in my first post about the Advantage Web API I talked about a class that I wrote which parsed a JSON result and created a DataTable object. This is an alternate to using specific classes to work with the results from a Web API request.

I like this method because it can generate a DataTable for any request so I don't have to create a specific class for each set of data I request. The generated DataTable is also very easy to bind to various .NET controls. Using specific classes provide a more strongly typed representation of the data and can be bound to controls with a little more effort. Defined objects can also be manipulated directly by a JSON serializer.

In order to create a DataTable we will have to parse the JSON ourselves, we cannot rely on the serializer. This is done with the following method. Note that there is a mechanism for error checking in the method.

private bool ParseJSON( string stringJSON )
{
  string sValue = string.Empty;
  dataTable = new DataTable();

  using ( JsonTextReader reader = new JsonTextReader(new StringReader(stringJSON)))
  {             
    // Move to the array of objects
    do
    {
      if (reader.TokenType == JsonToken.PropertyName 
          && reader.Value.ToString().Contains("error"))
      {
        parseError(reader);
        return false;
      }
      reader.Read();
    } while (reader.TokenType != JsonToken.StartArray);


    // Get the dataTable
    PopulateDataTable(reader);
                
    // Get the rest of the Information
    while (reader.Read())
    {
      if (reader.TokenType == JsonToken.PropertyName)
      {
        if (reader.Value.ToString().Contains("__next"))
        {
          reader.Read();
          nextURI = reader.Value.ToString();
        }

        if (reader.Value.ToString().Contains("rows_affected"))
        {
          reader.Read();
          rowsAffected = Convert.ToInt32(reader.Value);
        }

        if (reader.Value.ToString().Contains("last_autoinc"))
        {
          reader.Read();
          lastAutoinc = Convert.ToInt32(reader.Value);
        }
      }
    }
  }

  return true;
}

To create the DataTable object we examine the first object in the results array. The JSON.NET Library has a mechanism for determining the data type which we will use to create the columns in the data table. We also need to store the information we retrieve since we can only move forward through the JSON string. We will do this with a simple helper class that will store the Column Name, Data Type and Value.

private DataTable CreateDataTable(JsonReader reader)
{
  DataTable dt = new DataTable();
  string sItem = string.Empty;
  List lItems = new List();

  // Create a data row based on supplied table
  DataRow dr = dt.NewRow();

  // Put the values into the datarow
  while (reader.TokenType != JsonToken.EndObject)
  {
    try
    {
      if (reader.TokenType == JsonToken.PropertyName)
        sItem = reader.Value.ToString();
      else
      {
        switch (reader.TokenType)
        {
          case JsonToken.Boolean:
            dt.Columns.Add(sItem, Type.GetType("System.Boolean"));
            break;
          case JsonToken.Date:
            dt.Columns.Add(sItem, Type.GetType("System.DateTime"));
            break;
          case JsonToken.Float:
            dt.Columns.Add(sItem, Type.GetType("System.Double"));
            break;
          case JsonToken.Integer:
            dt.Columns.Add(sItem, Type.GetType("System.Int32"));
            break;
          case JsonToken.String:
          default:
            dt.Columns.Add(sItem, Type.GetType("System.String"));
            break;
        }
        
        // Store the column value
        lItems.Add(new DataRowItem(sItem, reader.TokenType, reader.Value.ToString()));
      }
    }
    catch (Exception ex)
    {
      Console.WriteLine(ex.Message);
    }

    reader.Read();
  } 

  // add the row to the datatable
  AddDataRow(lItems, dt);

  return dt;
}

The AddDataRow function adds the values that we stored in the DataRowItem object into a new row in the newly created DataTable.

private static bool AddDataRow(List lDataItems, DataTable dt)
{
  // Create a data row based on supplied table
  DataRow dr = dt.NewRow();

  foreach (DataRowItem di in lDataItems)
  {
    switch (di.ColumnType)
    {
      case JsonToken.Boolean:
        dr[di.ColumnName] = Convert.ToBoolean(di.ColumnValue);
        break;
      case JsonToken.Date:
        dr[di.ColumnName] = Convert.ToDateTime(di.ColumnValue);
        break;
      case JsonToken.Float:
        dr[di.ColumnName] = Convert.ToDouble(di.ColumnValue);
        break;
      case JsonToken.Integer:
        dr[di.ColumnName] = Convert.ToInt32(di.ColumnValue);
        break;
      case JsonToken.Null:
        dr[di.ColumnName] = null;
        break;
      case JsonToken.String:
        dr[di.ColumnName] = di.ColumnValue;
        break;
    }
  }

  // add the row to the datatable
  dt.Rows.Add(dr);

  return true;
}

After the first record has been read and the table has been created the rest of the records can be added without having to create a DataItem object. Therefore, there is an overloaded version of AddRow

private static bool AddDataRow(JsonReader reader, DataTable dt)
{
  string sItem = string.Empty;

  // Create a data row based on supplied table
  DataRow dr = dt.NewRow();

  // Put the values into the datarow
  while (reader.TokenType != JsonToken.EndObject)
  {
      try
      {
        if (reader.TokenType == JsonToken.PropertyName)
          sItem = reader.Value.ToString();
        else
        {
          switch (reader.TokenType)
          {
            case JsonToken.Boolean:
              dr[sItem] = Convert.ToBoolean(reader.Value);
              break;
            case JsonToken.Date:
              dr[sItem] = Convert.ToDateTime(reader.Value);
              break;
            case JsonToken.Float:
              dr[sItem] = Convert.ToDouble(reader.Value);
              break;
            case JsonToken.Integer:
              dr[sItem] = Convert.ToInt32(reader.Value);
              break;
            case JsonToken.Null:
              dr[sItem] = null;
              break;
            case JsonToken.String:
              dr[sItem] = reader.Value.ToString();
              break;
          }
        }
      }
      catch (Exception ex)
      {
        Console.WriteLine(ex.Message);
      }

      reader.Read();
  }
  // add the row to the datatable
  dt.Rows.Add(dr);

  return true;
}

As I said in the beginning this is a bit more difficult than using pre-defined objects/classes with a JSON serializer/deserializer. However, DataTables are very easy to bind to many of the controls available in the .NET Compact Framework. The downside is that the data types may not always be correct depending on the serializer you are using.

Monday, October 25, 2010

Book Review – Database in Depth

DatabaseInDepth-Date[3]In keeping with my "Back to Basics" theme for this year I picked up a copy of Database In Depth by C.J. Date. This book includes a basic introduction into the relational database model and how it is different than many of the many implementations currently available. This book discusses the relational theory as developed by E.F. Codd and how this theory has become the basis for how data is manipulated today.

C.J. Date covers this very complex topic using many examples and discussions. I found it very enlightening and useful although it took some effort to get through the book. The material is explained and examples are given, however, sometimes I had to do the provided exercises in order to really get a firm grasp on the information. This is definitely a book that requires some effort by the reader.

The first chapter of the book is a quick introduction into the terminology used in relational theory and how some of it is different than the SQL model which gets more attention. The following four chapters go into these various types and relationships in much more detail. The next two chapters focus more on how the relational theory is applied with respect to constraints and database design. The final chapter defines the relational model and compares it to other data models.

Terminology is a major factor in this book. I tend to think of databases in a SQL sense which is slightly different than the relational sense. SQL is based on rowsets or resultsets whereas relational theory uses relvars and tuples to define data. Once I was comfortable with the differences the information was easier to digest.

Of particular note is the fact that Mr. Date does not support the implementation of nulls in databases. He makes some convincing arguments in chapter three. Essentially, it boils down to the complexity of three value logic. Because a boolean result can now return three values ( true, false or unknown ) instead of just two. I agree with his point, however, in the real world I see practical uses for allowing null.

The final chapter does a good job of wrapping up the information presented in the book as well as provides a definition of the relational model. Below are the five components of the relational model ( from chapter eight page 164 ):

    1. An open-ended collection of scalar types, including the particular type BOOLEAN (truth values)
    2. A relation type generator and an intended interpretation for relations of types generated thereby
    3. Facilities for defining relation variables of such generated relation types
    4. A relational assignment operator for assigning relation values to such relation variables
    5. An open-ended collection of generic relational operators for deriving relation values from other relation values.

The bottom line: this book contains a lot of useful information on the foundations of modern database systems. It is highly technical and covers the topics in a very textbook manner.  Although the book is not an "easy read" there is a ton of good information in the 200 pages. This isn't the kind of book you read straight through. It takes time to get through the material and it even includes many exercises used to reinforce the information.

Friday, October 22, 2010

Handling Errors with the Advantage Web API

The one thing that I didn't discuss in my previous post was how to handle errors returned from an Advantage Web API request. If an error occurs when making a request the error information is packaged up as a JSON response just like a successful data request. Therefore, errors can be handled using classes just like we did with data results.

Below is a sample error response received from a request to the Web API:

{
  "error": {
    "code": "7200",
    "message": {
      "lang": "en-US",
      "value": "Error 7200:  AQE Error:  State = HY000;   NativeError = 5004;  [iAnywhere Solutions][Advantage SQL][ASA] Error 5004:  Either ACE could not find the specified file, or you do not have sufficient rights to access the file. Table name: SomeTable"
    }
  }
}

Instead of the results array we received with a successful request we are now getting error information. So we need to create classes for the serializer to load the information into. The error object defined in the JSON includes a code and a message object. Therefore we will need two classes to handle an error.

// processes the error tag
public class oError
{
  public string code;
  public oErrorMessage message;
}

// processes the message tag
public class oErrorMessage
{
  public string lang;
  public string value;
}

Finally we will need to add this new error object to the oDataResult class so it can be processed. This allows us to process the JSON once checking for either results or an error. You will need to set the MissingMemberHandling property to ignore otherwise an error would occur during deserialization. So our oDataResult class contains three items.

public class oDataResults  // T needs to be a list of objects
{
  public DInfo d;
  public oError error;
  public oQueryMeta __metadata;
}

Now when we make a request we can check for an error before using the list of results.

using (HttpWebResponse response = request.GetResponse() as HttpWebResponse)
{
  using (Stream dataStream = response.GetResponseStream())
  {
    using (StreamReader reader = new StreamReader(dataStream))
    {
      JsonSerializer serializer = new JsonSerializer();
      serializer.MissingMemberHandling = MissingMemberHandling.Ignore;

      oDataResults olist;
      olist = (oDataResults)serializer.Deserialize(
               new JsonTextReader(reader),
               typeof(oDataResults));

      // Check for any errors
      if (olist.error == null)
        dgTable.DataSource = olist.d.results;
      else
        MessageBox.Show(olist.error.message.value);
    }
  }
}

Wednesday, October 20, 2010

Consuming Advantage Web API Results

As I discussed in my last post the Advantage Web API returns data using JSON in a format based on the oDATA Protocol Standard. In order to use this data it needs to be transformed into an object that the client can work with. Let's begin by looking at a sample of the data returned from the Advantage Web API. I Included only a single record in the sample and I included the additional information ( rows_affected and last_autoinc ) which will be returned with each request.

{
  "d": {
    "results": [
      {
        "__metadata": {
          "uri": "https://Server.localdomain:6282/adsweb/example/v1/query/select * FROM customer"
        },
        "CustID": "c50585b4-b039-4843-a092-ef00da72bb90",
        "CustNum": 10000,
        "LastName": "Martin",
        "FirstName": "Denise",
        "Gender": "F",
        "CompanyID": 446,
        "CustomerSince": "1953-10-08",
        "Address1": "16907 HERITAGE COURT",
        "Address2": null,
        "City": "Wolf Point",
        "State": "MT",
        "ZipCode": "59201",
        "CellPhone": "(555) 555-4289",
        "WorkPhone": "(555) 555-9415"
      },
    ],
    "__next": "https://Server.localdomain:6282/adsweb/example/v1/query/select%20*%20FROM%20customer?$skiptoken=21"
  },
  "__metadata": {
    "rows_affected": -1,
    "last_autoinc": 0
  }
}

The curly braces ( {} ) are used to distinguish objects within the string. The brackets ( [] ) are used to indicate arrays. Therefore the rows are defined within the results array. JSON serializers can be used to deserialize this into an object as long as the object conforms to the data provided in the string. Additionally we need to have a list of the object since the results object is an array of the rows. The object and list are defined below:

// definition of Customer fields
public class Customer
{
   public string CustID;
   public int CustNum;
   public string LastName;
   public string FirstName;
   public string Gender;
   public int CompanyID;
   public DateTime CustomerSince;
   public string Address1;
   public string Address2;
   public string City;
   public string State;
   public string ZipCode;
   public string CellPhone;
   public string WorkPhone;
}

// List of customers 
public class CustomerRows : List { }

The serializer will copy the information from the results array into the two objects defined above. The values will be assigned based on the names defined in the JSON so the types defined in the class must have exactally the same names. These classes must be defined for each table or query that you want to receive.

There are a few more classes that we need to define to handle the rest of the JSON string. We will still need classes to handle the d and the final metadata information. Unlike the classes mentioned above these classes can be reused for any JSON object. These objects are shown below:

// Processes the __metadata tag
public class oDataResults  // T needs to be a list of objects
{
   public DInfo d;
   public oQueryMeta __metadata;
}

// processes the results tag
public class DInfo
{
   public T results;
   public string __next;
}

// processes the final __metadata tag
public class oQueryMeta
{
   public int rows_affected;
   public int last_autoinc;
}

The first class ( oDataResults )determines the type that will be used when the results array is processed. The DInfo class allows the serializer to put the data into the specified type and gets the __next value. The oQueryMeta class gets the rows_affected and last_autoinc values.

With all of our classes defined all we need to do is send our request and process the results.

using (HttpWebResponse response = request.GetResponse() as HttpWebResponse)
{
  using (Stream dataStream = response.GetResponseStream())
  {
     using (StreamReader reader = new StreamReader(dataStream))
     {
       JsonSerializer serializer = new JsonSerializer();
       
       oDataResults oList;
       olist = (oDataResults)serializer.Deserialize(
				new JsonTextReader(reader), 
				typeof(oDataResults));
       
       // Bind the list of customer objects to a datagrid control   
       dgCustomer.DataSource = olist.d.results;
     }
  }
}

We will have more sample code available with the release of the Advantage Web API.

Monday, October 18, 2010

Advantage Web API with Windows Mobile

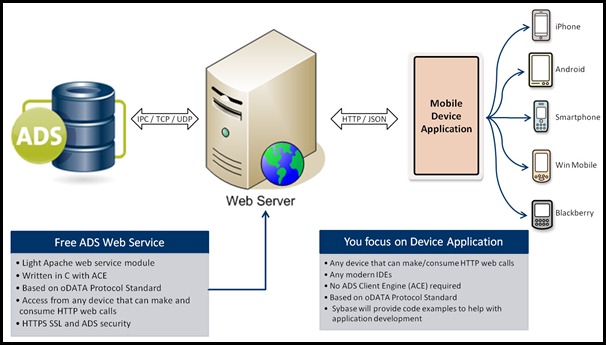
The Advantage Web API is a framework for allowing developers to access their data from virtually anywhere on just about any device. It consists of a set of pre-built web services running on a lightweight version of Apache. The interface will provide both SQL and Table style access methods to Advantage data. Communication is secure over HTTPS using SSL and requires data dictionary authentication. The basic architecture is shown below.

AdsWeb_Arcitecture
AdsWeb_WM6_CustomerList Now that we have established the basic framework it is time to create a simple Windows Mobile 6 application that retrieves data from the Advantage Web API. In this case we are going to simply send a query to the server to retrieve a list of customers as shown.

The first step is to create our web request with an appropriate URL. We then need to add some header information which includes the result type ( application/JSON ) and our authentication. Once the request has been created we then execute the request. The request is sent via HTTPS ensuring that the authentication and data are transferred securely. This means that the server is using some type of certificate to provide the secure communication.

string sURI = "https://localhost:6282/adsweb/example/v1/query/";
sURI += "SELECT%20*%20FROM%20CustomerList";
HttpWebRequest request = WebRequest.Create(sURI) as HttpWebRequest;
request.Accept = "application/json";
string auth = "Basic " + Convert.ToBase64String(Encoding.ASCII.GetBytes("adssys:"));
request.Headers["Authorization"] = auth;

In my case I am using a self-signed certificate which is not recognized by the device. Initially when I made the request i received a "Could not establish a trust relationship with remote server" error message. This is because there is no default mechanism for allowing users to accept an unknown certificate. In order to resolve this error by creating a custom certificate verification handler. You can get all the details from this MSDN article.

The next step is to process the result returned by the request. The data is returned back as a JSON string that we can parse. In my case I used the JSON.NET library from CodePlex to create my own parser. The AdsDataObject stores metadata contained in the request and dynamically builds a DataTable based on the returned data. I'll provide the details on this object in a future post.

Here is the code that processes the response to the web request. Once the request has been processed the data can be shown in the data grid.

using (HttpWebResponse response = request.GetResponse() as HttpWebResponse)
{
  using (Stream dataStream = response.GetResponseStream())
  {
    using (StreamReader reader = new StreamReader(dataStream))
    {
       string json = reader.ReadToEnd();

       oData = new AdsDataObject(json);
       dgCustomer.DataSource = oData.dataTable;
    }
  }
}

By default a maximum of 20 rows are returned with each request, you can change this by using the $top parameter ( i.e. …/query/select%20*%20from%20table?$top=10). The request includes an additional parameter, named __next, which contains a URL for getting the next records. The parser/deserializer that you use will need to capture this value.

Saturday, October 16, 2010

SWFox Conference 2010 Wrap-Up

SWFox2010 We wrapped up our participation at SWFox on Saturday night. We gave away our Sybase Developer's Rock t-shirts and some Advantage 10 pens. We also provided copies of the latest Advantage book to all of the FoxPro user groups who had representatives attending.

We had a second opportunity to present our class on extending FoxPro data to mobile devices on Saturday morning. Once again we had several attendees and we were able to have a good discussion of the technology and the mobile landscape. Overall the technology was well received and I got some great feedback on how it could be used in the field.

SWFox2010_Giveaway This year we gave away two of the bran new AppleTV devices. We gave one away at the dinner reception on Friday night and the other was given away after lunch on Saturday. I would like to congratulate David Bernard and Ross Taylor and I hope they enjoy their new AppleTVs.

Finally my thanks once again to all the conference organizers; Rick Schummer, Doug Hennig and Tamar Granor who always make the conference run smoothly. See you all next year.

Friday, October 15, 2010

SWFox Conference 2010

This was my fourth year attending the South West FoxPro conference. The event took place at a new venue this year the Legado Conference & Reception Center in Gilbert Arizona. I thought the conference center in the new hotel was better than in the past, and the rooms were quite nice. However, I enjoyed staying at the Arizona Golf Resort for the past conferences.

The event began with a keynote ( watch the video ) on Thursday night followed by a reception in the expo hall. I got an opportunity to catch up with several attendees that I have talked to at previous conferences and user group meetings. I am sure I say this every year but I always enjoy working with the FoxPro community.

We presented a session on extending data to a mobile device using our new Advantage Web API which is currently in beta ( sign-up ). Essentially the Web API will provide an interface for retrieving data over any Internet connection. The data is returned as a JavaScript Object Notation (JSON) object which contains the data formatted based on the oData specification. JSON is a lightweight text notation similar to XML which is easy to read and write. Several JSON serializers are available for a variety of languages.

The class was well attended and we had several good questions. Since this API allows access to any of the data types supported by Advantage it is a good fit for FoxPro developers. Using compatibility mode existing FoxPro data can be sent to virtually any device easily and securely, without changing the existing application.

The conference continues through the weekend and I'll have another update tomorrow.

Wednesday, October 13, 2010

SWFox Conference

I will be attending and presenting at the Southwest FoxPro Conference once again this year. The conference begins tomorrow and runs through Sunday. This year I'll be talking about mobilizing data which is another benefit Advantage brings to the FoxPro community. The abstract from my session is below:

Title: Extended VFP Application Data to a Mobile Device
Presenter: Chris Franz, Systems Consultant
Level: All
Friday, October 15, 2:00 p.m.
Saturday, October 16, 8:30 a.m.

Are your customers asking for mobile access to their VFP data? Do you need to start providing mobile access for a competitive edge? This session will cover how to extend your current VFP data to a mobile device. It will demonstrate how easy it is to allow concurrent DBF data access from your existing VFP application and a mobile device at the same time from virtually any mobile device using the IDE of your choice. There is no need to convert your data to allow DBF data access with mobile devices such as Blackberry, iPhone, Android, Windows Mobile, etc. all while allowing you the freedom to write the mobile application of your choice. Come see how!

The mobile access is possible through the use of our new Advantage Web API we are currently developing. It consists of a pre-configured version of Apache with bundled web services which allow data access. You can get an overview of this new project on JD's blog. If you want to try out the API for yourself you can sign up for the beta.

I'll have some updates from the conference over the next few days and much more about the Advantage Web API soon.

Monday, October 11, 2010

Book Review – Advantage Database Server: A Developer's Guide 2nd Edition

ADSDevelopersGuide2nd_Jensen[2] I'll say right up front that I was a technical editor for this book so my opinions might be a bit biased. That being said I highly recommend this book if you are an Advantage developer or are considering using Advantage Database Server with an application. The book covers all the features of Advantage in a concise format with plenty of examples. It is a must have for an Advantage developer.

The book is broken down into three parts two of which are included in the book and the third is available for download. Part one introduces the Advantage server and includes step-by-step examples for creating a sample database which demonstrates the various features. Part two discusses using SQL with Advantage including an entire chapter on using SQL scripting. Part three includes chapters on accessing data through Advantage from various development environments. All of the chapters in part three are available here.

In part one, Advantage and the Advantage Data Architect, there is a comprehensive overview of all the features in Advantage. After the introduction to the features and functionality of the server itself the following chapters break down specific tasks. Step-by-step exercises walk the reader through creating data dictionaries (databases), tables, indexes, constrains, referential integrity, and views. Then more advanced server functionality such as triggers, stored procedures, replication and notifications are covered.

Part two, Advantage SQL, includes an introduction to using SQL with Advantage. This includes many examples as well as a discussion of specific SQL requirements. Chapters also discuss performing common operations, SQL scripting and a discussion of obtaining metadata using SQL. I highly recommend reading chapter thirteen which is a discussion of the various SQL tools available with Advantage.

As mentioned above the chapters for part three are available online. Each chapter in the final part cover accessing data using Advantage from a different development environment. The following chapters are available:

  • Advantage and Delphi
  • Advantage and ADO.NET
  • Advantage and Java
  • Advantage and Visual Basic ( MDAC, OLE DB, ADO )
  • Advantage with ODBC, PHP and DBI

The bottom line; Hopefully you will look past my bias and pick up a copy of this book. It is an invaluable resource for any Advantage developer. It can also provide an excellent guide for new developers who are just getting started with Advantage. Cary has done a great job in writing an easy to read book with many easy to follow examples that walk the reader through many of the common database functions.

Friday, October 8, 2010

Using AdsConnectionStringBuilder

One of the classes included with the Advantage .NET Data Provider is the AdsConnectionStringBuilder. This class can be used to build connection strings or easily retrieve connection properties from a connection string. The AdsConnectionStringBuilder is a descendent of the DBConnectionStringBuilder class which is part of the .NET 2.0 framework, therefore you need to use the ADO.NET 2.0 version of the provider ( see July FAQs for more information ).

You may remember the example Advantage Configuration Forms I posted a couple of years ago. I was working with a new project and I decided to reuse one of these forms. As I read through the code I realized that I was storing each connection option in its own setting. In hindsight this seemed like the wrong approach, why not simply store the connection string itself. Not only does this make it unnecessary to parse the string myself, I just have to read it in and use it, it also makes the settings much clearer.

As it turns out the AdsConnectionStringBuilder is a perfect tool for doing this. It takes care of all the reading and writing of connection string options. See below for some simple examples.

// Loads the options
private void LoadConnectionOptions()
{
  AdsConnectionStringBuilder sbConn = 
    new AdsConnectionStringBuilder( Properties.Settings.Default.ConnString );

  txtDataPath.Text = sbConn.DataSource;
  txtUserName.Text = sbConn.UserID;
  txtPassword.Text = sbConn.Password;
  // Set other controls as needed
}

// Saves a connection string based on values in form controls
private void BuildConnectionString()
{
  AdsConnectionStringBuilder sbConn = new AdsConnectionStringBuilder();

  sbConn.DataSource = txtDataPath.Text;
  sbConn.UserID = txtUserName.Text;
  sbConn.Password = txtPassword.Text;
  // Gather other settings as needed

  Properties.Settings.Default.ConnString = sbConn.ConnectionString;
}

In this example I am storing the connection string as a regular application setting. You can also put connection strings in the connectionStrings section of the configuration file. However, I have found this more difficult to modify at run-time than the normal settings.

Wednesday, October 6, 2010

Do a Good Turn

I read a great blog post called Boy Scout Check-ins by Jeff Mouser several months ago. This article really stuck with me both because I have been involved in many Scouting programs but also as a programmer. The basic premise of the article is to make an effort to leave the code in better shape than when you found it. Change a variable name, rearrange code to make it more readable, remove dead code or irrelevant comments, etc.

During my brief hiatus from Advantage I worked with one of our development teams working on a desktop synchronization solution. As with any mature project there are millions of lines of code which have gone through many revisions. This gave me a new perspective on how much work goes into a commercial product and just how much code it takes to create a successful program.

As the size of the codebase for a program expands the need for concise coding becomes very important. Not only will this improve performance but it also allows for easier maintenance. By ensuring that the code we write is clear and concise it benefits the entire team.

Additionally if you uncover an issue while working on an unrelated task take the time to make the fix whenever possible. In some cases it would probably take less time to fix a simple problem than it would to enter a bug into a tracking system to be fixed later. Similarly removing code that has been commented out is an easy way to improve the readability of the code overall.

Another change that can improve readability is variable naming. This assumes that you have a standard variable naming convention that is followed by the entire team, something that I highly recommend. As you can imagine this can be a simple fix for function level variables but gets much more complicated as the scope of the variable grows.

As a final thought you can improve the code by ensuring standard formatting is used throughout the code that you are working on. Again this is generally a simple task to do in a relatively short time. However, Raymond Chen made a good point in his post – if your going to reformat source code, please don't do anything else at the same time.

Little fixes can go a long way in both good and bad ways. The bigger the project the more potential for a little change to have big ramifications. Therefore we need to be good Boy Scouts and make sure our "good turns" don't create problems for others. This is where a good source code control system becomes a vital tool for when our little change breaks more than it fixes.

Monday, October 4, 2010

Back on the air

You have probably noticed I have been absent from this blog for some time. I have been working almost exclusively for another group here at Sybase. It has been a great opportunity to exercise my programming skills and a chance to work with one of our fantastic development teams. However, it did not allow me to spend much time working on Advantage topics.

All that said I am now back and eager to spend more time with Advantage. I will be working on some new screencasts highlighting many Advantage features. A new How-To series is in the works as well. We will also be attending Southwest Fox again this year.

There should be several posts this week as I get a bunch of articles finished that have been in progress for far too long.

Friday, October 1, 2010

FAQs - September 2010

Limitations of Advantage Local Server

Advantage provides the Advantage Local Server (ALS) with every one of our supported clients. ALS provides an easy mechanism for developing an Advantage enabled application as well as a no-cost solution for peer-to-peer solutions. However, ALS has several limitations.

ALS does not include support for any of the following server related functions; transactions, online backup and replication. ALS is limited to five concurrent connections and cannot be used from a middle tier such as a web server or in a terminal server session.

ALS does include support for all other data dictionary functionality such as: referential integrity, stored procedures, triggers and notifications. It also respects all of the same commands as the full Advantage Database Server (ADS) product allowing for a near seamless migration from ALS to ADS.

Performance Improvements in Advantage 10

A new whitepaper comparing the performance of Advantage 9.x and Advantage 10 is now available. This whitepaper discusses several scenarios where version 10 outperforms version 9. These include transaction processing, multi-client performance and stored procedure execution. You can get a copy of this whitepaper using this link. For a complete list of Advantage white papers visit the official Advantage Database Server site.

6414 Error

A 6414 error "Connection forcefully refused" can occur if the packets sent to the Advantage server are incorrect. This is a defense mechanism against hacks and other types of attacks. With the release of Advantage 10 the communication protocol used by the client has changed slightly. More information is now being sent when the client connects making the packet size larger. Because the packet size is different if you attempt to connect using a version 10 client to an older version of the server you may receive a 6414 error.

Generally when connecting to an older serve with a newer client you should receive a 6316 error. However, some customers have been reporting the 6414 error. You can get more information in this KB article.

.NET Data Provider Load Errors

When distributing an application built with the Advantage .NET Data Provider I would recommend placing the DLL in the directory with your application. I would also recommend placing other required Advantage DLLs ( ACE32.dll, AXCWS32.dll, etc… ) in the application directory. By doing this the provider does not need to be registered in the Global Assembly Cache ( GAC ) on your target machines.

You should set some properties in your project to ensure that your application will find the provider correctly. First I recommend setting the Copy Local property to true and the Specific Version property to false for the Advantage.Data.Provider reference. You should also make sure that you are distributing the correct version of the DLL, most will use the ADO.NET 2.0 version ( i.e. version 10.0.2.3 ).