Friday, January 30, 2009

Tip #40 – Using sp_CreateIndex

Although you can create indexes using the SQL CREATE INDEX command the ANSI syntax does not allow index expressions or conditional statements. If you need to create an index with an expression or use conditional statements you will need to use the system procedure sp_CreateIndex. The system procedure also allows you to specify the filename for the index, the CREATE INDEX statement places the index in the structural index file.

The procedure parameters include: Table Name, Index FileName, Tag Name, Expression, Condition, Options and Page Size. In version 9.x an updated version of the procedure (sp_CreateIndex90) includes a parameter for the collation. An example usage of these functions are below:

// Create an index concatenating two fields
EXECUTE PROCEDURE sp_CreateIndex( 'Customer', 'Cust.adi',
   'NAME', 'LastName;FirstName', '', 2, 512); 
 
// A collation can be specified for 9.x
EXECUTE PROCEDURE sp_CreateIndex90( 'Customer','Cust.adi',
   'NAME', 'LastName;FirstName', '', 2, 512, '' ); 

The options value is specified as an integer. You set this option by adding together the values for the various options. For instance a compound candidate index would have an option value of 2050 (2 + 2048). The valid options and their values are listed below.

  • ADS_DEFAULT = 0
  • ADS_UNIQUE = 1
  • ADS_COMPOUND = 2
  • ADS_CUSTOM = 4
  • ADS_DESCENDING = 8
  • ADS_CANDIDATE = 2048

UPDATED 31 MAR 2009 – The original opening paragraph is below:

Although you can create indexes using the SQL CREATE INDEX command the ANSI syntax only accounts for single field indexes. If you need to create a multi-segmented index or use conditional statements you will need to use the system procedure sp_CreateIndex.

Thursday, January 29, 2009

Tip #39 – Full Text Search Indexes via SQL

The Advantage Full Text Search engine provides a robust mechanism for searching text and memo data within a table. Although it can be used without an index searches are much more efficient when an index has been created. The engine can also be used to search across multiple fields if an index is created. FTS indexes can only be created on text fields i.e. Character, CiCharacter, RAW, Memo, Binary, Image and VarChar.

Since full text search (FTS) indexes, also called content indexes, can only be created on a single field they can be created using a CREATE INDEX statement. You must use the CONTENT keyword to create a FTS index. You can specify various options such as Minimum Word Length, Maximum Word Length, Delimiters, Noise Words, Dropped Characters and Conditional Dropped Characters.

The following examples show usage of the CREATE INDEX statement.

// Create a basic FTS Index
CREATE INDEX Notes ON Orders ( NOTES ) CONTENT
 
// FTS index with options
CREATE INDEX NOTES ON ORDERS ( NOTES ) 
  CONTENT MIN WORD 3 MAX WORD 30
  DROPCHARS '''"`'
  CONDITIONALS ',.?!;:@#$%^&()-_'
  IN FILE "ORDERS.cdx";
  
// New keyword overwrites defaults
// only use " and ` as drop chars
CREATE INDEX NOTES ON ORDERS ( NOTES ) 
  CONTENT MIN WORD 3 MAX WORD 30
  NEW DROPCHARS '"`'

Wednesday, January 28, 2009

Tip #38 – Getting Index Information via SQL

I previously discussed the various system tables which provide information about dictionary objects. In this tip I will go into more detail about the system.indexes table and system.indexfiles system tables.

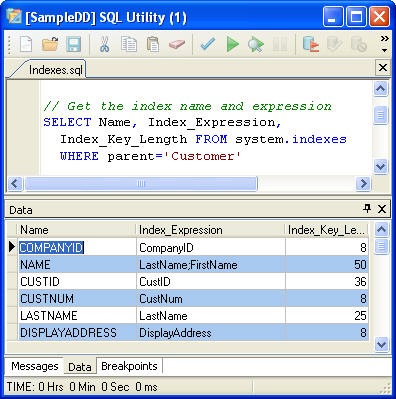
The system.indexes table contains information about all of the indexes defined in the data dictionary. Since the information is accessed via a system table you can use a WHERE clause to obtain the information you need. You can even use full text search to locate all indexes which contain a field name. The following example retrieves a list of all the indexes in the customer table along with the index expression.

ARC_SQL_SystemIndexes

The system.indexes table also includes information about full text search (content) indexes. These fields are prefixed by Index_FTS_ and include; Min_Length, Delimiters, Noise, Drop_Chars and Conditional_Chars.

FTS Index Info

The system.indexfiles table provides information about the index files associated with the data dictionary. Like system.indexes the Parent field contains the name of the table the index file is associated with.

system.indexfiles

Tuesday, January 27, 2009

Tip #37 – Using ApplicationID with SQL

The ApplicationId property was added to Advantage in version 8.0. This property allows developers to specify an ID for their application when connecting to Advantage. By default this property is set to the name of the executable which is connecting (i.e. ARC.exe).

This property can be set and read using SQL statements. To set the ApplicationID use the sp_SetApplicationID system procedure. The ID can be retrieved using the sp_GetApplicationID system procedure or using the ApplicationID() SQL scalar function. See the examples below:

// Set the ApplicationID to Chris
EXECUTE PROCEDURE sp_SetApplicationID('Chris')
 
// Retrieve the ApplicationID
EXECUTE PROCEDURE sp_GetApplicationID()
 
// Using the ApplicationID SQL Scalar Function
SELECT APPLICATIONID() FROM system.iota

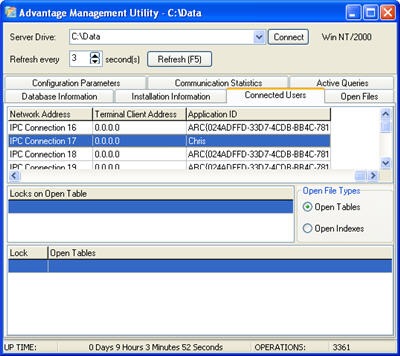
The ApplicationID will also be reported by the remote management utility in ARC. You can also get management information with SQL statements see Management via SQL. The ApplicationID is displayed on the connected users tab.

ARC Management Utility

Monday, January 26, 2009

Tip #36 – Pack and Zap Tables Using SQL

Records which are deleted from DBF tables are not removed from the file they are marked as deleted. To remove these deleted records from the table a pack operation is required. Tables can be packed using the ACE API, TDataSet Descendent, .NET Data Provider or via the system procedure sp_PackTable. The pack removes all deleted records from the table and re-indexes the table.

Like DBFs Advantage Database Tables (ADTs) do not physically remove deleted records from the table. Instead deleted records are marked for reuse so a subsequent insert operation will not increase the size of the file. You can get more details from the help file.

You can delete all records in the table using the DELETE command, however, these records are simply marked for deletion. To physically remove the records you would then have to pack the table. You can substitute these two commands with a zap command which deletes all records then packs the table. To zap a table use the system procedure sp_ZapTable.

Examples of these functions are below:

// Physically remove deleted records and re-index
EXECUTE PROCEDURE sp_PackTable('C:\Data\Custtemp.adt')
 
// Permanantly remove all records from the table
EXECUTE PROCEDURE sp_ZapTable('C:\Data\Custtemp.adt')

Friday, January 23, 2009

Tip #35 – Generating SQL Scripts for Free Tables

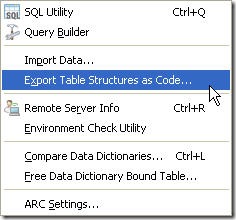
ARC Tools Menu Generating SQL scripts for creating data dictionary objects is as easy as a right-click. For free tables ARC includes a utility for creating code for the tables. This utility can be used for both free tables and dictionary bound tables. The utility will generate Delphi, C++ Builder and SQL code for generating the table. It will also generate the code to add all of the records to the table after it is created. Although I would only recommend doing this for tables which have only a few records.
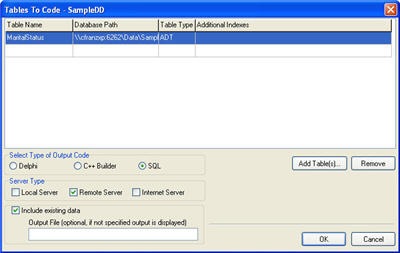
After you select the Export Table Structures as Code… menu option the Tables To Code utility will open. You can select one or more tables from the current connection to export. In the following example (click to see the full size image) I selected the MaritalStatus table which is a domain table which contains status codes. In this case I want to export the data since it is a standard set which will be used by everyone using the database.

Tables To Code

In this case clicking on the OK button generated the following SQL Script:

/* Table Type of MaritalStatus is ADT*/
Create Table MaritalStatus( Status CIChar( 50 ), Code Char( 1 ) );
 
Create Unique Index CODE on MaritalStatus( CODE );
 
INSERT INTO "MaritalStatus" VALUES( 'Single', 'S' );
INSERT INTO "MaritalStatus" VALUES( 'Married', 'M' );
INSERT INTO "MaritalStatus" VALUES( 'Divorced', 'D' );
INSERT INTO "MaritalStatus" VALUES( 'Widowed', 'W' );

Thursday, January 22, 2009

Tip #34 – Using the Data Dictionary Differentiator

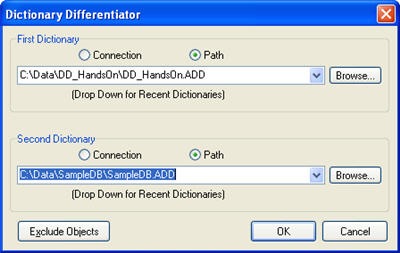
Advantage Data Architect includes a tool which helps in generating SQL Scripts for modifying database objects in the Data Dictionary called the Data Dictionary Differentiator. You can open this tool by choosing Compare Dictionaries or pressing ctrl-L. When the tool opens you will get a screen which allows you to select the dictionaries you wish to compare.

ARC Differentiator

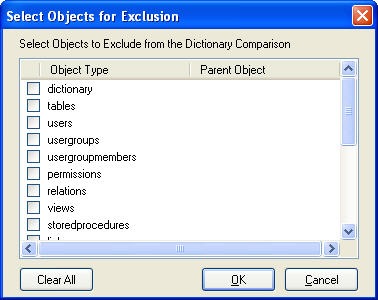
You can also select items to exclude for the comparison by pressing the Exclude Objects button. This is useful if you only want to include changes for particular objects or if you know you have only changed Views for example.

ARC_DifferentiatorExclude

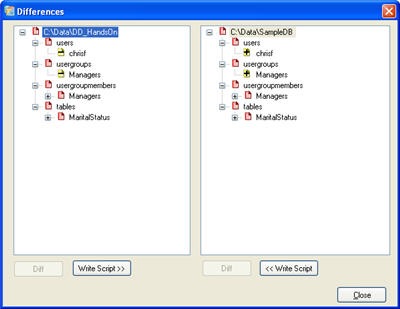
Once the tool has compared the data dictionaries a treeview displaying the differences will be shown. From this screen you can generate SQL scripts to convert from one version of the dictionary to the other.

ARC Differences

In my example the tool generated the following code to convert HandsOn to SampleDB (two versions of my training database). Notice that the script is not quite complete since the tool cannot get the user password so you must add this to the script.

EXECUTE PROCEDURE sp_CreateUser 
   ( 'chrisf', '' /* YOUR PASSWORD GOES HERE */,
     'My admin account' );
EXECUTE PROCEDURE sp_ModifyUserProperty 
   ( 'chrisf', 'ENABLE_INTERNET', 'TRUE' );
EXECUTE PROCEDURE sp_CreateGroup 
   ( 'Managers','Company managers group' );
EXECUTE PROCEDURE sp_AddUserToGroup 
   ( 'chrisf',   'Managers' );
 
ALTER TABLE MaritalStatus
     ALTER COLUMN Code Code Char( 1 ) POSITION 2
     ALTER COLUMN Status Status CIChar( 50 ) POSITION 1;

Wednesday, January 21, 2009

Tip #33 – Generate SQL Scripts for Database Objects

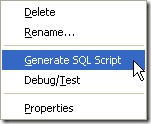
ARC_GenerateSQL Advantage Data Architect has the ability to generate SQL Scripts for any data dictionary object. This allows for simple generation of statements which can be used to add the object in another data dictionary. You can generate the SQL Script by right-clicking on any dictionary object and choosing Generate SQL Script. This functionality is only available for data dictionary objects.
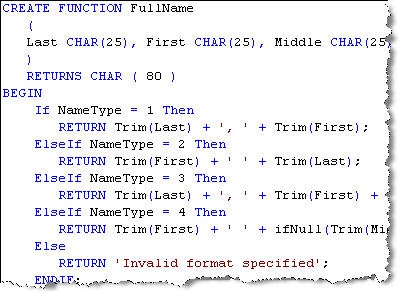
After selecting this option a new SQL window will be opened containing all the SQL necessary to create the object.

Create Function

To generate SQL to modify existing objects use the Data Dictionary Differentiator tool, which can be found on the tools menu (Compare Data Dictionaries). As with any generated code take the time to review and test it prior to implementation.

Tuesday, January 20, 2009

Tip #32 – ARC Off Screen

Advantage Data Architect (ARC) saves its last position when it closes so it will appear in the same place the next time it is opened. This can be very convenient although it can be an issue if you change your monitor configuration. For example; I use a docking station for my laptop in the office which is attached to multiple monitors. If I have used ARC and positioned it on the second monitor it will retain that position. When I open ARC with my laptop undocked it will open in a position off the screen.

Of course, this problem isn’t unique to ARC many applications do exactly the same thing and it isn’t a problem if the ARC is running when the monitor configuration or resolution changes. I have seen this problem with many different applications, since most remember their last size and position so they appear the same the next time they are open.

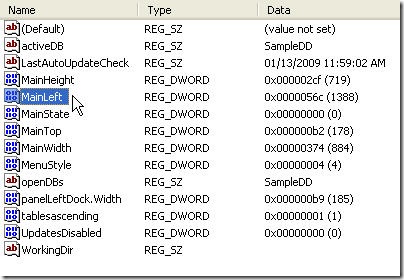
If you have changed your monitor configuration since the last time you opened ARC or you have a remote connection to a multi-monitor system you may not be able to see ARC when you open it. To resolve this issue you simply need to close ARC, it should be visible on the taskbar or you can use Task Manager. Then open up regedit and go to the ARC registry keys. The key locations are listed below (x = 0 or 10)

  • Version 9 - HKEY_CURRENT_USER\Software\Advantage Data Architect\9.x
  • Version 8 - HKEY_CURRENT_USER\Software\Extended Systems\Advantage Data Architect\8. x

From there modify the MainLeft value to move the startup position inside your current resolution. You may also need to modify the MainHeight and MainTop values. Once this value has been modified start ARC again and it should show up on your screen.

ARC_RegistryKeys

Monday, January 19, 2009

Tip #31 – Assigning Permissions for Multiple Database Objects

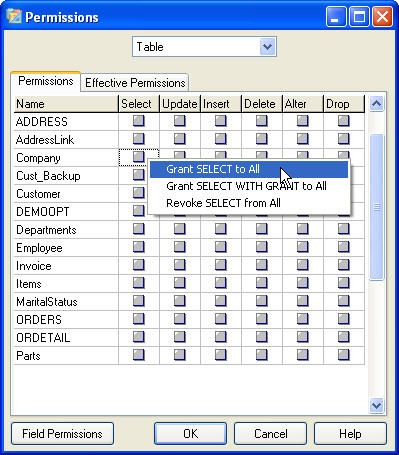
To assign permissions for various database objects you choose properties of a user or group and then click the Permissions button. This brings up the permissions dialog which lists the various database objects. Clicking on the checkboxes changes the permission for the corresponding object. This could possibly take a long time if you have many database objects, fortunately there is a shortcut which makes this process easier.

You can right-click on a column (Select in the example below) which brings up a context menu. You from here you can grant the permission to all objects listed (tables in the example), grant the permission with the ability to grant the same permission to other users and groups or revoke the permission for all objects.

ARC_PermissionsGrant

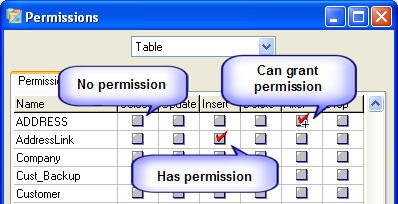
The checkboxes have three different states: No permissions, permission, permission with grant. The first is just the gray box, the second a red check mark in the box and the third is a red check mark with a plus sign in the box. The screenshot below shows the different states:

Permission Indicators

Friday, January 16, 2009

Tip #30 – Modifying Permissions with SQL

User and group permissions can become very complicated, there are many different combinations of permissions for various database objects. It is always best to assign permissions to groups and assign users to the appropriate group. Permissions with Advantage are additive so the user will always have the highest permission assigned directly or inherited from the group(s) they are a member of. Valid permissions are listed below:

  • SELECT
  • INSERT
  • UPDATE
  • DELETE
  • EXECUTE
  • ACCESS
  • INHERIT
  • ALTER
  • CREATE
  • DROP
  • WITH GRANT

Permissions are assigned using the GRANT SQL Statement. Permissions are removed using the REVOKE SQL statement. You can allow groups or users to assign permissions by specifying WITH GRANT when granting permissions. This allows the members of the group or individual users to assign these permissions to other users and groups.

// Assign Read permission on Customer table to Managers group
GRANT SELECT ON Customer TO Managers;
 
// Assign multiple permissions on Customer table
GRANT INSERT, UPDATE ON Customer TO Managers;
 
// Assign all permissions 
GRANT ALL ON Invoice TO Managers;
 
// Assign Insert permission on Customer table 
// to Managers group with grant permission
GRANT INSERT ON Customer TO Managers WITH GRANT;
 
// Remove Read permission from user chrisf on Customer table
REVOKE READ ON Customer FROM chrisf 
 
// Remove all Permissions from user chrisf on Invoice table 
REVOKE ALL ON Invoice FROM chrisf

You can also modify field permissions by specifying the field (column) name when specifying a permission( i.e SELECT(column name) ). Create permissions are assigned for each individual object type.

// Add Create Table permissions to Managers
GRANT CREATE TABLE TO Managers
 
// Add Create View permissions to Managers with grant
GRANT CREATE VIEW TO Managers WITH GRANT

Thursday, January 15, 2009

Tip #29 – Modifying Users and Groups with SQL

Database users can be modified using the sp_ModifyUserProperty system procedure. This procedure allows a developer to modify the following properties:

  • Comment
  • User Password
  • Enable Internet
  • Logins Disabled
  • User Defined Property

In general you need administrative permissions to modify these properties with the exception of User Password. All users have rights to modify their own password. Administrators can modify the password for any user with the exception of the adssys account. You must be logged in as adssys to modify the adssys password.

Groups can be modified using the sp_ModifyGroupProperty system procedure. Unlike the sp_ModifyUserProperty groups only contain a comment property. Adding and removing users from groups is done with the sp_AddUserToGroup and sp_RemoveUserFromGroup system procedures. Examples of these are listed below:

EXECUTE PROCEDURE sp_ModifyUserProperty( 'chrisf', 'ENABLE_INTERNET', 'TRUE');
  
EXECUTE PROCEDURE sp_ModifyGroupProperty( 'Managers', 'COMMENT', 'Company managers group');
  
EXECUTE PROCEDURE sp_AddUserToGroup( 'chrisf', 'Managers');
  
EXECUTE PROCEDURE sp_RemoveUserFromGroup( 'roberts', 'Managers');

Wednesday, January 14, 2009

Tip #28 – Create Users with SQL Statements

Users can be created using a system procedure by the administrator (adssys) or any user who has been granted ALTER permission on the data dictionary. With version 9.x you can also add users to the DB:Admin group to give them full administrative rights to the data dictionary.

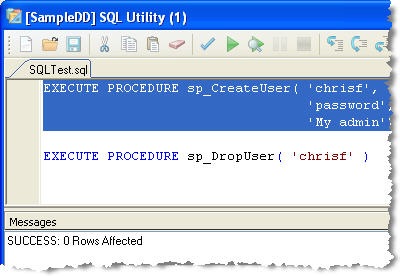
To create a user use the sp_CreateUser system procedure. This procedure takes three parameters; Username, Password and Comment. This procedure will create the new user in the dictionary with the specified password and comment. Users must have a unique name otherwise a 5132 “Invalid Object Name” error will be returned.

Users can be removed from the database using the sp_DropUser system procedure. If the user does not exist a 5132 error will be returned otherwise the user is removed from the database.

SQL User System Procedures  You can also create and remove groups by using the sp_CreateGroup and sp_DropGroup respectively.
Tuesday, January 13, 2009

Tip #27 – Get a List of Running SQL Statements

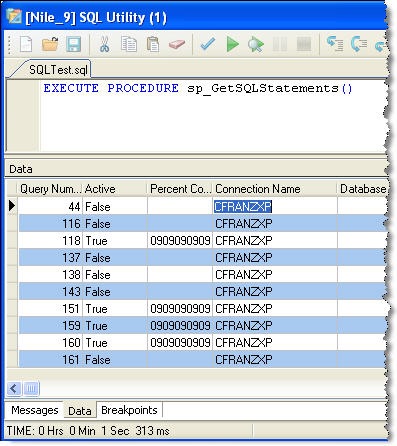
Advantage has many built-in stored procedures, called system procedures, which provide a wealth of information.  These system procedures can provide database information, manipulate database objects and provide management information. One of these procedures retrieves the list of currently running SQL statements. The sp_GetSQLStatements procedure returns the same data you can view o n the Management Utility in ARC.

Running Queries

This statement returns the following information:

  • Query Number
  • Active
  • Percent Complete
  • Connection Name
  • Database User
  • Database
  • Query
  • IsScript
  • Full Script
  • Start Time
  • Seconds Until Finished

Monday, January 12, 2009

Tip #26 – Input Variables in SQL Stored Procedures

Advantage Stored Procedures use virtual tables for both input and output they are __input and __output. There are several approaches to obtaining the input values for use within your procedure. My personal favorite is to create a cursor for the __input table. With this method I can access each of the values in the table using dot notation, see the example below:

   1: -- Get total sales for Customer and Sales rep
   2: DECLARE cInput CURSOR AS SELECT * FROM __input;
   3:  
   4: OPEN cInput;
   5: FETCH cInput;
   6:  
   7: INSERT INTO __output SELECT COUNT(InvoiceNo), SUM(InvoiceTotal) FROM Orders
   8: WHERE CustomerID = cInput.CustId AND EmployeeID = cInput.EmpId;
   9:  
  10: CLOSE cInput;

The __input table will have one and only one row so only a single FETCH is required. You can also use variables to store the input values which would not require using a cursor, see the example below:
   1: -- Get total sales for Customer and Sales rep
   2: DECLARE @iCustId INTEGER;
   3: DECLARE @iEmpId INTEGER;
   4:  
   5: SET @iCustId = SELECT CustId FROM __input;
   6: SET @iEmpId = SELECT EmpId FROM __input;
   7:  
   8: INSERT INTO __output SELECT COUNT(InvoiceNo), SUM(InvoiceTotal) FROM Orders
   9: WHERE CustomerID = @iCustId AND EmployeeID = @iEmpId;

In this example the amount of code is about the same, however, more input variables would require more variables in the second method and the first method requires no additional code.

As a final note you can combine the two methods if you need to manipulate one of your input variables.

   1: DECLARE cInput CURSOR as SELECT * FROM __input;
   2: DECLARE @dAmount as MONEY;
   3:  
   4: OPEN cInput;
   5: FETCH cInput;
   6:  
   7: @dAmount = cInput.BudgetAmount;
   8:  
   9: ...

Friday, January 9, 2009

Tip #25 – Creating Additional Connections to the Same Dictionary

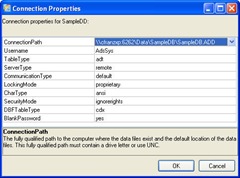
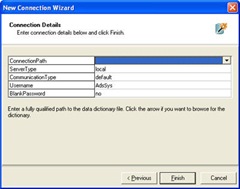
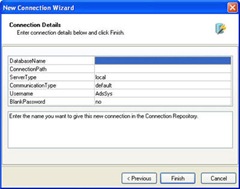
ARC_ConnectionProperties In ARC 8.0 we introduced the connection repository which allows users to define connections to dictionaries and free tables. The connections in the repository contain a lot of information as you can see in the properties dialog. There is also a wizard which walks you through the process of creating a new connection to a data dictionary or directory of free tables. The wizard can also step through creation of a new data dictionary.

With ARC 8.x the wizard automatically assigned the name of the new connection to the dictionary name that you connected to. This could be problematic if you were attempting to make a connection with different properties to the same dictionary or to another dictionary with the same name. To make a new connection to a dictionary with the same name as one already in the connection repository use the Connection->New Connection menu option.

The version 9.x New Connection Wizard allows you to specify a name when creating the connection. Remember that you can set the connection defaults so when you create a new connection it will have the properties you specified. The New Connection wizards for version 8 and 9 are pictured below.

Connection Wizard v8  Connection Wizard v9

Thursday, January 8, 2009

Tip #24 – Resizing the SQL Execution Plan Display

The SQL Execution Plan is a useful tool which can help optimize your SQL statements. It provides both a resultset containing details about each step of the plan as well as a graphical representation of the plan. With complex SQL statements the plan can involve many steps which makes the graphical representation large.

ARC_SQLPlanZoomLevel To make the graphical plan more manageable ARC has three zoom levels available. Simply right click on the Execution Plan tab and choose the zoom level you want. The following screenshots show the various zoom levels ( click for full size images ).
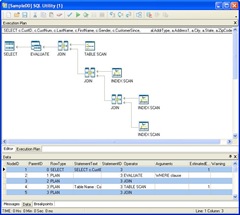
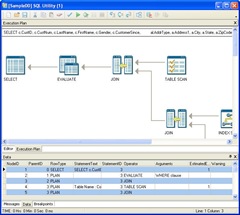
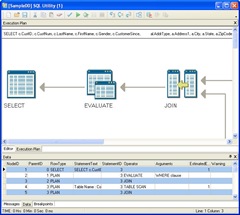
 Execution Plan 50%  Execution Plan 100%  Execution Plan 150%

Wednesday, January 7, 2009

Tip #23 – Parse Execution Plan

You can view the SQL Execution plan for any query in the ARC SQL Utility by simply clicking the Show Plan (ARC_ShowPlanButton ) button. This will generate a resultset which contains the details on how the SQL will be processed and create a graphical representation of the plan. You can also show the plan for any SQL statement by using SHOW PLAN FOR before your SQL statement.

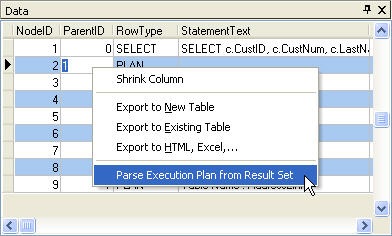
Using the SHOW PLAN FOR syntax does not generate the graphical interface, however, you can right-click on the data grid and choose Parse Execution Plan from Resultset to generate the graphical plan. This option will only work for a SHOW PLAN result other data will report an error.

ARC Parse SQL Execution Plan

ARC_SamplePlanClick on the image to see a full size view of my example plan.  You may also want to view the tech-tip on viewing the SQL execution plan which provides more detail.

Tuesday, January 6, 2009

Tip #22 – Quickly Exporting Query Results

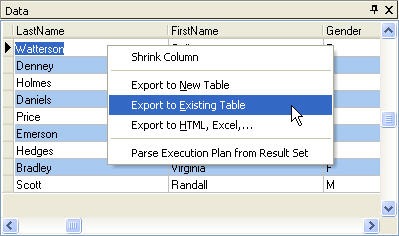
You can export the contents of the SQL Window grid using the context menu. A quick right-click in the grid brings up three export options as shown below.

ARC_ExportTable

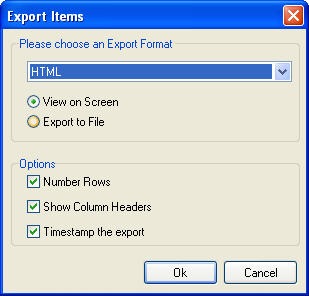
The first two options could be accomplished using a SELECT . . . INTO statement or a INSERT INTO statement respectively. The Export to HTML, EXCEL,… option allows for much more flexibility. Selecting this option opens the following dialog:

ARC_ExportItems

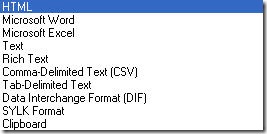
Data Export Formats With this option you can export the data directly to a file or preview it on the screen. Additional information about the exported data can be included by specifying the options. The supported export formats are listed in the drop-down combobox, shown on the left.
Monday, January 5, 2009

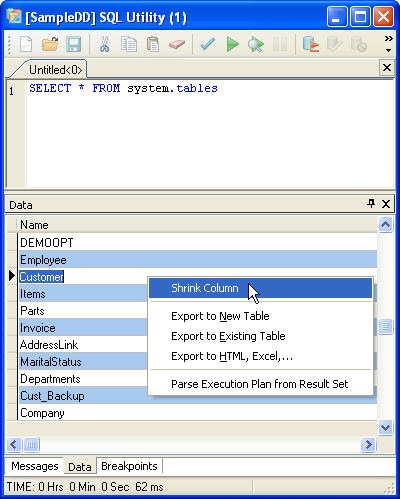
Tip #21 – Shrink a Grid Column in ARC

When opening a table in ARC many times the width of the field stretches it beyond the width of the screen. This makes it difficult to resize the column. Beginning with ARC version 8.0 a context menu item was added which shrinks the selected column by 50%. Simply right-click on the column you wish to shrink and choose the Shrink Column item.

 ARC_ShrinkColumn

After selecting this option the column will usually fit within the screen allowing you to resize it further.

Friday, January 2, 2009

Another Month of Tips

I thought I would start the new year off with another set of Advantage Tips. I will publish an Advantage related tip every weekday starting on Monday January 5th and ending on Friday January 30th. These tips will focus on Advantage Data Architect (ARC) and SQL tips and example scripts. All of the tips I have done can be found in one of the following categories.

  • Server – Tips related to the Advantage Database Server in general
  • ARC – Tips related to Advantage Data Architect
  • SQL – Tips related to using Structured Query Language

Of course I can’t take all the credit for these tips. I gathered ideas from the Advantage Technical Support Team, Advantage R&D and of course the customers who I have been lucky enough to work with over the years.

You can get a complete list of the first group of tips here. If you have a suggestion for a tip feel free to send me an e-mail.